
# Vue 生命周期、自定义指令、模板引用的原理与实践
TIP
从本节内容开始,学习 Vue 组件的生命周期、自定义指令、模板引用相关核心基础与实践
Vue 组件生命周期
- 什么是生命周期
- 什么是生命周期函数(钩子)
- 生命周期函数(钩子)
自定义指令
- 如何定义自定义指令
- 自定义指令钩子
- 自定义
v-focus指令 - 指令钩子的参数
v-focus指令添加参数与修饰符- 自定义指令函数写法
- 自定义
v-style与v-display指令 - 自定义全局指令
自定义指令:实战应用
- 自定义
v-debounce防抖指令 - 自定义
v-drag元素拖拽指令 - 自定义
v-lazyload图片懒加载指令 - IntersectionObserver 构造函数
# 一、Vue 组件的生命周期
TIP
Vue 组件生命周期相关的内容
- 什么是生命周期
- 什么是生命周期函数(钩子)
- 生命周期函数(钩子)
# 1、什么是生命周期
TIP
在 Vue 中每个以.vue结尾的文件就是一个组件,每个组件都有自己的生命周期
生命周期(Life Cycle)是指一个对象从 创建 -> 运行 -> 销毁 的整个阶段,强调的是一个时间段。
比如人的一生,从出生到死亡的整个阶段,称为人的生命周期。
- 一个人的出生,表示这个人生命周期的开始
- 一个人的离世,表示这个人生命周期的结束
- 在世期间的这一生,就是这个人的生命周期
因此,我们将 Vue 程序从创建到销毁的整个过程,称为 Vue 的生命周期
- Vue 程序的创建,表示 Vue 生命周期的开始
- Vue 程序的销毁,表示 Vue 生命周期的结束
- Vue 程序从创建到销毁的整个过程,就是 Vue 的生命周期
# 2、什么是生命周期函数(钩子)
TIP
每个 Vue 组件实例在被创建时都要经过一系列的初始化过程,如:
- 设置数据监听
- 编译模板
- 将实例挂载到 DOM
- 数据变化时更新 DOM
- .....等
这个过程中会在特定时间点运行一些叫做生命周期钩子的函数,让开发者有机会在特定阶段运行自己的代码。
总结
- 生命周期函数(钩子):是由 Vue 框架提供的内置函数,会伴随着生命周期,自动按次序执行
- 生命周期函数的作用:允许开发者在特定的时间点,执行某些特定的操作。
# 3、Vue 生命周期函数(钩子)
TIP
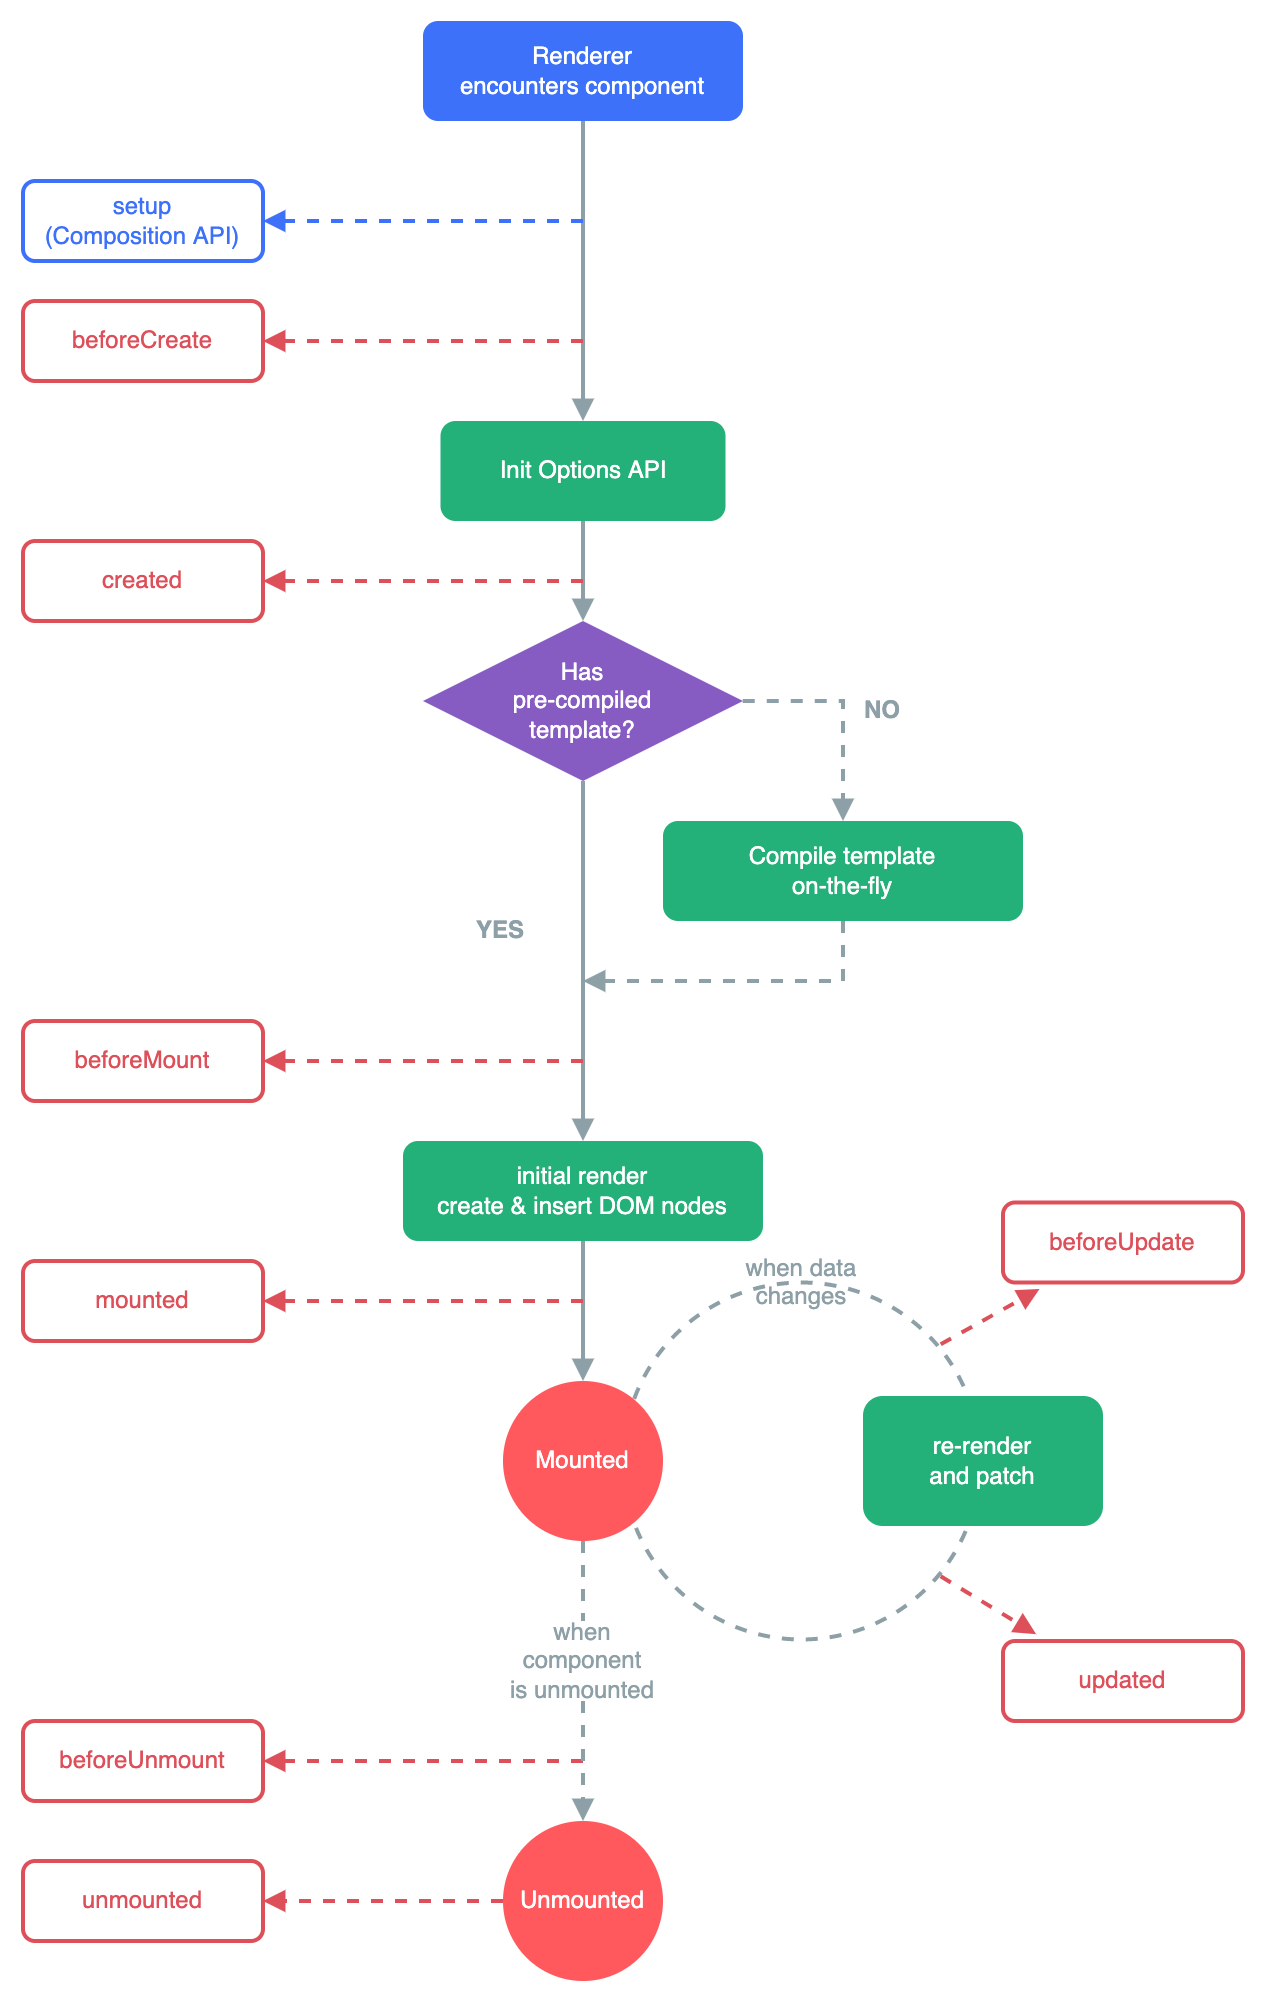
以下是 Vue 组件的生命周期图示,图中从上到下完整的展示了 Vue 组件生命周期的完整过程:
- 创建:设置数据监听(data 数据、计算属性、方法和侦听器)等、编译模板
- 挂载:实例挂载到 DOM
- 更新:数据变化时更新 DOM
- 销毁:组件被卸载
图中红色箭头所指向的函数为 Vue 提供的生命周期函数(钩子),这些不同的钩子函数,分别在不同的时期执行。
| 生命周期函数 | 执行阶段 |
|---|---|
| beforeCreate | 组件创建 |
| created | 组件创建 |
| beforeMount | DOM 挂载前 |
| mounted | DOM 挂载后 |
| beforeUpdate | DOM 更新前 |
| updated | DOM 更新后 |
| beforeUnmount | 组件销毁前 |
| unmounted | 组件销毁后 |
# 3.1、生命周期函数的基本使用
TIP
使用生命周期函数分以下 2 步:
- 在组件实例中注册对应的生命周期函数
- 把需要执行的代码写在对应的生命周函数内
这样 Vue 就会在对应的时间点自动帮我们调用这些生命周期函数执行相应的代码
注意: 生命周期函数内部的
this指向当前组件实例
<script>
export default {
  data() {
    return {
      message: "Hello Vue!",
    };
  },

  // 在实例初始化之后,进行数据侦听和事件/侦听器的配置之前同步调用
  beforeCreate() {
    console.log("beforeCreate");
  },
  // 在实例创建完成后被立即同步调用
  created() {
    console.log("created");
  },
  // ....
};
</script>
接下来,我们就来学习这些不同的生命周期函数,分别在何时被调用,我们可以在这个阶段做些什么事情。
# 3.1、beforeCreate
TIP
会在实例初始化完成、props 解析之后、data() 和 computed、methods 等选项处理之前立即调用。
在这个生命周期函数中,我们是没有办法访问到
data中的属性,以及methods中的方法等其它选项的数据。
<script>
export default {
  data() {
    return {
      message: "Hello Vue",
    };
  },
  methods: {
    update() {
      console.log("Hello Vue3");
    },
  },
  beforeCreate() {
    console.log(this.message); // undefined
    console.log(this.update); // undefined
  },
};
</script>

<template>
  <div>{{ message }}</div>
</template>
注:
以上代码,最终在控制打印出两个undefined,说明,在beforeCreate函数中是没有办法访问到data中的属性与methods中的方法等。
# 3.2、created
TIP
created生命周期函数会在在组件实例处理完所有与状态(数据)相关的选项后调用。created生命周期函数调用时,响应式数据、计算属性、方法和侦听器等内容已经设置完成。所以我们可以在这个函数中访问到组件的数据,计算属性,方法等。- 此阶段挂载还未开始,所以这个阶段我们没有办法访问组件实例的 DOM(如:
$el属性还不可用)
$el (opens new window) 为组件实例的属性,用来获取该组件实例管理的 DOM 根节点
<script>
export default {
data() {
return {
message: "Hello Vue",
arr: [1, 2, 3, 4],
};
},
methods: {
update() {
console.log("Hello Vue3");
},
},
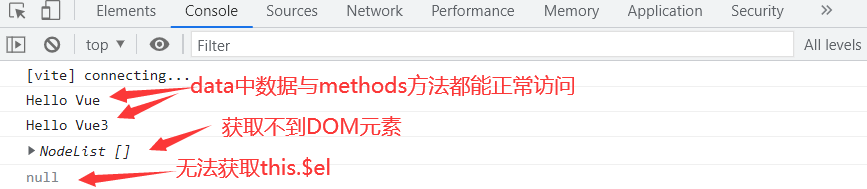
created() {
// -----以下内容可以正常访问到-----
// 访问组件实例的属性
console.log(this.message); // Hello Vue
// 访组件实例的方法
this.update(); // Hello Vue3
// ------以下内容访问不到 -----
// 此时虚拟DOM还没有挂载到页面变成真实DOM,所以访问不到
const div = document.querySelectorAll(".box");
console.log(div); // [ ]
// 此时挂载阶段还未开始,因此 $el 属性仍不可用
console.log(this.$el); // null
},
};
</script>
<template>
<div class="box">
<ul>
<li v-for="item in arr">{{ item }}</li>
</ul>
</div>
</template>
以上代码最终在 console 控制台打印如下结果
# 3.3、beforeMount
TIP
beforeMount函数会在在组件首次被挂载到页面之前调用。beforeMount函数被调用时,组件已经完成了其响应式状态的设置,但还没有创建 DOM 节点。它即将首次执行 DOM 渲染过程。- 他与
created函数相比,这个阶段 Vue 对模板做了编译。
如果我们想在 DOM 挂载到页面前做一些相关的操作,就可以在这里执行。不过实际开发中这种需求较少。因为,如果我们想要更改数据,最好的方式是在beforeCreate或created中来处理。这样就不会因为数据的变更,再次对模板进行编译。
<script>
export default {
data() {
return {
message: "Hello Vue",
arr: [1, 2, 3, 4],
};
},
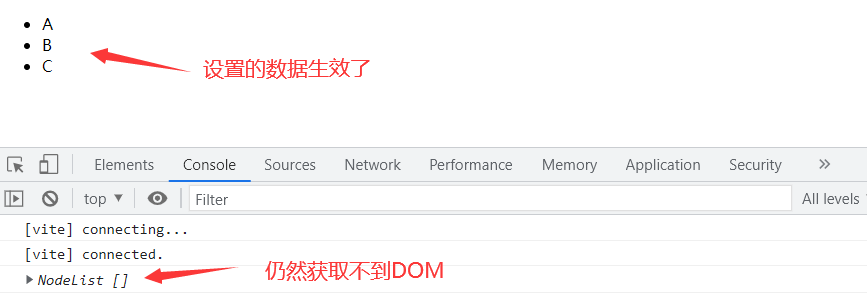
beforeMount() {
const div = document.querySelectorAll(".box");
console.log(div);
this.arr = ["A", "B", "C"];
},
};
</script>
<template>
<div class="box">
<ul>
<li v-for="item in arr">{{ item }}</li>
</ul>
</div>
</template>
# 3.4、mounted
TIP
mounted函数在组件被挂载到页面之后调用
以下情况下视为已挂载:
- 所有同步子组件都已经被挂载。(不包含异步组件或
<Suspense>树内的组件) - 其自身的 DOM 树已经创建完成并插入了父容器中(注意仅当根容器在文档中时,才可以保证组件 DOM 树也在文档中)。
如果我们想在访问组件所渲染的 DOM,做相关的 DOM 操作,则可以在这里执行。此阶段,可以访问到$el
<script>
export default {
  data() {
    return {
      message: "Hello Vue",
      arr: [1, 2, 3, 4],
    };
  },
  methods: {
    update() {
      console.log("Hello Vue3");
    },
  },
  mounted() {
    const div = document.querySelectorAll(".box");
    const list = document.querySelectorAll(".box ul li");
    console.log(div);
    console.log(list);
    console.log(this.$el);
  },
};
</script>

<template>
  <div class="box">
    <ul>
      <li v-for="item in arr">{{ item }}</li>
    </ul>
  </div>
</template>

# 3.5、beforeUpdate
TIP
beforeUpdate在响应式数据发生改变后,DOM 被更新之前调用- 如果想在 Vue 更新 DOM 之前对 DOM 做相关的操作,可以把相关操作代码写在
beforeUpdate函数中
<script>
export default {
  data() {
    return {
      arr: [1, 2, 3],
    };
  },
  beforeUpdate() {
    console.log("访问数据为更新后数据", this.arr);
    const list = document.querySelectorAll(".box ul li");
    console.log(list);
  },
};
</script>

<template>
  <button @click="arr = [1, 2, 3, 4, 5]">更新数据</button>
  <div class="box">
    <ul>
      <li v-for="item in arr">{{ item }}</li>
    </ul>
  </div>
</template>

注:
点击更新数据按扭后,观察控制台的输出内容,发现获取的数据是最新的,但 DOM 元素是更新前的,也就是此时 DOM 还没有挂载到页面中。
# 3.6、updated
TIP
- 响应式数据发生改变后,会重新更新 DOM 树,
update方法会在 DOM 树更新之后调用 - 如果你想对更新后的 DOM 做相关的操作,则可以在此函数中执行。
注意:一定要避免在此期间更改状态(响应式数据),这可能会导致无限的更新循环!
<script>
export default {
  data() {
    return {
      arr: [1, 2, 3],
    };
  },
  updated() {
    console.log("访问数据为更新后数据", this.arr);
    const list = document.querySelectorAll(".box ul li");
    console.log(list);
  },
};
</script>

<template>
  <button @click="arr = [1, 2, 3, 4, 5]">更新数据</button>
  <div class="box">
    <ul>
      <li v-for="item in arr">{{ item }}</li>
    </ul>
  </div>
</template>

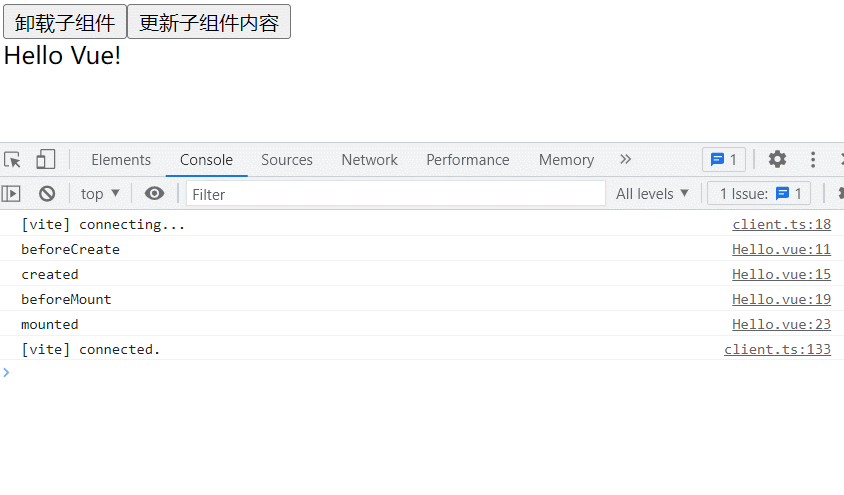
# 3.7、beforeUnmount 与 unmounted
TIP
beforeUnmount钩子函数,在一个组件实例被卸载之前调用。当这个钩子被调用时,组件实例依然还保有全部的功能。unmounted在一个组件实例被卸载之后调用。
一个组件在以下情况下被视为已卸载:
- 其所有子组件都已经被卸载。
- 所有相关的响应式作用 (渲染作用以及
setup()时创建的计算属性和侦听器) 都已经停止。
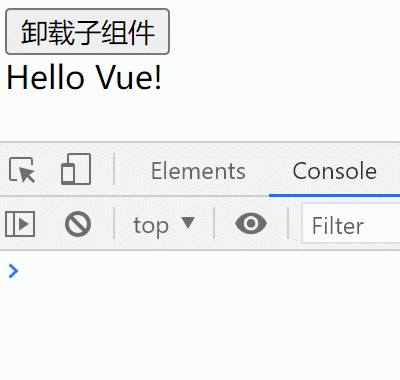
应用:
可以在这个beforeUnmount钩子中手动清理一些副作用,例如计时器、DOM 事件监听器或者与服务器的连接。
代码演示
App.vue文件(根组件)
<script>
  // 引入子组件
  import Hello from "./components/Hello.vue";
  export default {
    data() {
      return {
        bool: true,
      };
    },
    // 注册子组件
    components: {
      Hello,
    },
  };
</script>

<template>
  <!--当点击按扭后,bool为false,如果v-if的值为假,Hello子组件将不会被渲染,相当于卸载-->
  <button @click.once="bool = !bool">卸载子组件</button>
  <Hello v-if="bool"></Hello>
</template>
Hello.vue文件(子组件)
<script>
  export default {
    data() {
      return {
        message: "Hello Vue!",
      };
    },
    // 在组件实例被卸载之前调用
    beforeUnmount() {
      console.log("BeforeUnmount");
    },
    // 组件实例被卸载之后调用
    unmounted() {
      console.log("Unmounted");
    },
  };
</script>

<template>
  <div>{{ message }}</div>
</template>
以上代码最终执行效果如下:
# 4、总结:Vue 生命周期
以下是 Vue 组件生命周期函数及函数的执行时机且此阶段 Vue 组件完成了什么
| 生命周期函数 | 执行阶段 | 说明 |
|---|---|---|
| beforeCreate | 组件创建 | 会在实例初始化完成、props 解析之后、data() 和 computed、methods 等选项处理之前立即调用。 |
| created | 组件创建 | 在组件实例处理完所有与状态(数据)相关的选项后调用。 |
| beforeMount | DOM 挂载前 | 在组件(DOM)被挂载到页面(或父容器)之前调用。 |
| mounted | DOM 挂载后 | 在组件(本质是 DOM)被挂载到页面(或父容器)之后调用 |
| beforeUpdate | DOM 更新前 | 在响应式数据发生改变后,DOM 被更新之前调用 |
| updated | DOM 更新后 | 在响应式数据发生改变后,导致的虚拟 DOM 重新渲染,并被挂载到页面后调用。 |
| beforeUnmount | 组件销毁前 | 在一个组件实例被卸载之前调用 |
| unmounted | 组件销毁后 | 在一个组件实例被卸载之后调用 |
代码演示
<script>
// 引入子组件
import Hello from "./components/Hello.vue";
export default {
  data() {
    return {
      n: 1,
    };
  },
  // 注册子组件
  components: {
    Hello,
  },
};
</script>

<template>
  <!--当点击按扭后,n=2,则v-if的值为假,Hello子组件将不会被渲染,相当于卸载-->
  <button @click="n = 2">卸载子组件</button>
  <Hello v-if="n === 1"></Hello>
</template>
Hello.vue文件(子组件)
<script>
export default {
  data() {
    return {
      message: "Hello Vue!",
    };
  },

  // 在实例初始化之后,进行数据侦听和事件/侦听器的配置之前同步调用
  beforeCreate() {
    console.log("beforeCreate");
  },
  // 在实例创建完成后被立即同步调用
  created() {
    console.log("created");
  },
  // 在挂载开始之前被调用
  beforeMount() {
    console.log("beforeMount");
  },
  // 实例被挂载后调用
  mounted() {
    console.log("mounted");
  },
  // 在数据发生改变后,DOM 被更新之前被调用
  beforeUpdate() {
    console.log("beforeUpdate");
  },
  // 在数据更改导致的虚拟 DOM 重新渲染和更新完毕之后被调用
  updated() {
    console.log("updated");
  },
  // 在组件实例被卸载之前调用
  beforeUnmount() {
    console.log("BeforeUnmount");
  },
  // 组件实例被卸载之后调用
  unmounted() {
    console.log("Unmounted");
  },
};
</script>

<template>
  <div @click="message = '内容更新'">{{ message }}</div>
</template>
# 二、自定义指令
TIP
通过前面的学习,我们知道指令的作用就是帮助我们简化 DOM 元素的操作。如果 Vue 内置的指令不能满足我们的需求时,Vue 允许我们注册自定义指令(Custom Directives)。
当我们需要直接对 DOM 元素做相关的重复性操作时,我们可以将这些重复性的操作定义成指令,实现复用。在需要执行相关操作的元素上,添加相关指令即可。
# 1、如何定义自定义指令
TIP
- 所有的自定义指令都需要定义在组件的
directives选项中。 - 一个自定义指令由一个包含类似组件生命周期钩子的对象来定义,这些钩子函数分别会在不同的时间点被自动调用
- 每个钩子函数,都有 4 个参数,4 个参数的详细介绍在下面会介绍
指令命名规范
指令定义时采用驼峰命名,并且不需要加v-前缀,在调用时需要加上v-前缀,并且需采用-分隔形式,如:v-my-directive
创建自定义指令
以下代码中的myDirective为自定义指令
<script>
  export default {
    data() {
      return {
        n: 10,
        bool: true,
        msg: "update",
      };
    },
    // 所有自定义指令需在此处注册
    directives: {
      // myDirective为自定义指令名,定义时采用驼峰命名,
      // 调用时,采用-分隔形式,且要加上v-前缀,如:v-my-directive
      myDirective: {
        // 在绑定元素的 attribute 前
        // 或事件监听器应用前调用
        created(el, binding, vnode, prevVnode) {
          console.log("created");
        },
        // 初次渲染,在该元素被插入到 DOM 前调用
        beforeMount(el, binding, vnode, prevVnode) {
          console.log("beforeMount");
        },
        // 在绑定元素的父组件,及他自己的所有子节点都挂载完成后调用
        mounted(el, binding, vnode, prevVnode) {
          console.log("mounted");
        },
        // 绑定元素的父组件更新前调用 (元素更新,相当于父组件更新,父件其它内容更新,本质整个DOM会重新渲染)
        beforeUpdate(el, binding, vnode, prevVnode) {
          console.log("beforeUpdate");
        },
        // 在绑定元素的父组件,及他自己的所有子节点都更新后调用
        updated(el, binding, vnode, prevVnode) {
          console.log("updated");
        },
        // 绑定元素的或其父组件卸载前调用
        beforeUnmount(el, binding, vnode, prevVnode) {
          console.log("beforeUnmount");
        },
        // 绑定元素或其父组件卸载后调用
        unmounted(el, binding, vnode, prevVnode) {
          console.log("unmounted");
        },
      },
    },
  };
</script>

<template>
  <button @click.once="bool = !bool">卸载元素</button> |
  <button @click="msg = 'updated'">更新msg的值</button>

  <div>msg的值:{{ msg }}</div>
  <!-- 指令定义时不用加v-,使用时需要加上v-前缀 -->
  <div v-my-directive v-if="bool">n的值: {{ n }}</div>
</template>
以上代码最终渲染效果如下:
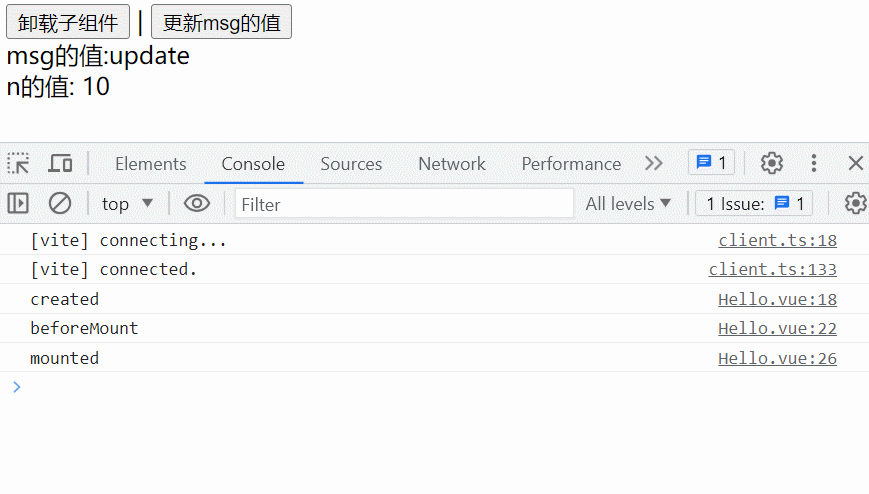
注:观察以上图片,可以看到
- 初始渲染时,只有
created、beforeMount、mounted三个钩子被调用了 - 当点击按扭更新 msg 的值时,会触发 DOM 的重新渲染,则
beforeUpdate、updated两个钩子被调用 - 当点击按扭卸载元素时,
beforeUnmount与unmounted两个钩子被调用
# 2、自定义指令钩子
TIP
指令的钩子中的created、beforeMount、mounted 钩子有以下需要注意的点:
created与beforeMount钩子函数中,是没有办法访问到当前元素之后的元素,但可以访问该元素之前的元素。因为在该元素插入页面前,他前面的元素已经插入到页面,而后面的元素还没有mounted钩子中可以访问到当前元素父元素中的所有子元素
<script>
  export default {
    data() {
      return {
        n: 10,
        isShow: true,
      };
    },
    // 所有指令,都需要在这里定义(注册)
    directives: {
      myDirective: {
        // 在绑定元素的 attribute 前
        // 或事件监听器应用前调用
        created(el, binding, vnode, prevVnode) {
          console.log("---created");
          // 只能访问到第一个button,不能访问到第二个button
          console.log(document.querySelectorAll("button"));
        },
        // 初次渲染,在元素被插入到 DOM 前调用
        beforeMount(el, binding, vnode, prevVnode) {
          console.log("---beforeMount");
          // 只能访问到第一个button,不能访问到第二个button
          console.log(document.querySelectorAll("button"));
        },
        // 在绑定元素的父组件
        // 及他自己的所有子节点都挂载完成后调用
        mounted(el, binding, vnode, prevVnode) {
          console.log("---mounted");
          // 两个button都能访问到
          console.log(document.querySelectorAll("button"));
        },
      },
    },
  };
</script>

<template>
  <button>第1个button</button>
  <div v-my-directive v-if="isShow">n的值是:{{ n }}</div>
  <button>第2个button</button>
</template>
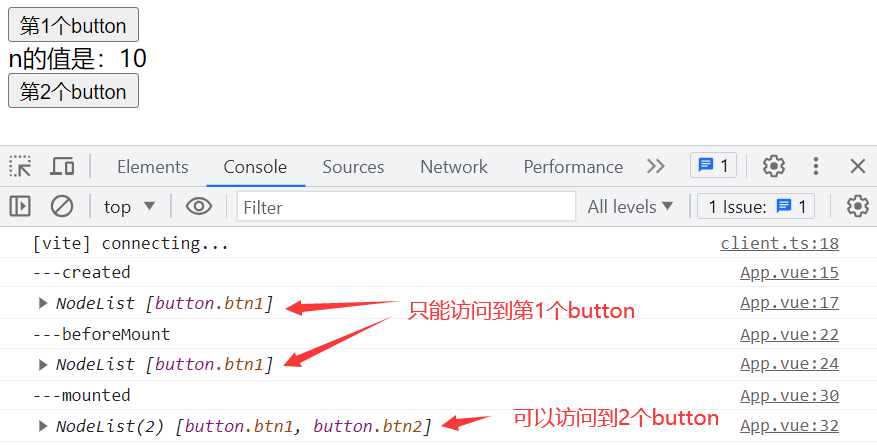
注:
- 观察以上执行结果我们发现,在
created与beforeMount钩子中只能访问到第一个 button,没有办法访问到第二个button,是因为第二个button此时还没有插入到页面中。 - 在
mounted钩子中可以访问到所有button,因为此时 DOM 元素已插入到了页面中。
# 2.1、总结:指令钩子执行时机
TIP
自定义指令钩子的执行时期大概分为以下 4 个阶段
- 元素创建阶段:此阶段指令与元素成功绑定,此阶段会执行
created与beforeMount钩子。不过此阶段不能访问到该元素之后的元素,因为此时该元素与之后的元素还没有插入到页面中。 - 挂载阶段:此阶段元素及子元素和父组件都被挂载到页面中。此阶段会执行
mounted钩子。在此阶段可以访问到该组件的所有元素。 - 更新阶段:当响应式数据更新后(该数据可以与当前指令绑定元素无关),会重新渲染模板。此阶段会执行
beforeUpdate与updated钩子。 - 销毁阶段:元素或其父元素即将销毁。此阶段会执行
beforeUnmount与unmounted钩子。
# 2.1、指令钩子中 this
TIP
在自定义指令钩子中,this 最终指向的是undefined。
因为在钩子函数中,我们并不需要使用 this。只需要知道当前绑定指令的元素和指令相关信息,而这些信息都通过钩子的前两个参数传递给到我们了。
注意区分:
前面学习的的methods、computed、watch 选项中函数的this指向当前组件实例。
<script>
export default {
  data() {
    return {
      n: 10,
    };
  },
  // 所有指令,都需要在这里定义(注册)
  directives: {
    myDirective: {
      created(el, binding) {
        console.log(this); // undefined
      },
    },
  },
};
</script>

<template>
  <div v-my-directive>n的值是:{{ n }}</div>
</template>
# 3、自定义 v-focus 指令
TIP
定义v-focus指令,该指令用来实现当一个 input 元素被 Vue 插入到 DOM 中后,它会被自动获,同时边框边红。
按正常逻辑,input 元素只有被插入到 DOM 后才能能获取焦点,所以相关逻辑需要写在 mounted 钩子中。
你可以复制以下代码测试
v-focus指令的效果。
<script>
export default {
  directives: {
    // 自定义v-focus指令
    focus: {
      /*
            // 指令与元素绑定前
             created(el) {
              el.focus();
              el.style.outline = "none"
              el.style.border = "1px solid red"
            },
            // DOM元素被添加到页面前
            beforeMount(el) {
              el.focus()
              el.style.outline = "none"
              el.style.border = "1px solid red"
            },
            */
      mounted(el) {
        // el 为绑定指令的元素
        el.style.outline = "none";
        el.focus();
        el.style.border = "1px solid red";
      },
    },
  },
};
</script>
<template>
  <input type="text" v-focus />
</template>
注:经过测试,你会发现
- 代码写在
created或beforeMount钩子中,input元素边框确实变红的,但是没有获取到焦点。 - 代码写在
mounted钩子中,input元素边框变红,同时获取到了焦点。
原因在于
created或beforeMount钩子中,元素还没有插入到页面,所以代码中el.focus()并没有生效,因为元素要被插入到页面后,才能获取焦点。
# 4、指令钩子的参数
TIP
指令的钩子会传递以下几种参数
// 指令钩子
mounted(el,binding,vnode,prevNode) {   }
el:指令绑定到的元素。可以用于直接操作绑定指令的 DOM 元素binding:一个对象,包含以下属性value:传递给指令的值,如:v-focus="n"指令中,n 的值为 30,则 value 值是 30oldValue:指令之前的值,仅在beforeUpdate和updated中可用。无论值是否更改,它都可用。arg:传递给指令的参数 (如果有的话) 如:v-focus:input='n'指令中,input为指令的参数,modifiers:一个包含修饰符的对象 (如果有的话)。 如v-focus.radius='n'指令中,.radius为指令的修饰符,最终modifiers的值是{radius:true}instance: 使用该指令的组件实例dir:指令的定义对象,如:{ mounted(){ }}
vnode:代表绑定元素的底层 VNodeprevNode:之前的渲染中代表指令所绑定元素的 VNode。仅在beforeUpdate和updated钩子中可用。
示例代码
<script>
export default {
  data() {
    return {
      n: 30,
      message: "",
    };
  },
  // 所有指令,都需要在这里定义(注册)
  directives: {
    focus: {
      // 在绑定元素的父组件
      // 及他自己的所有子节点都挂载完成后调用
      updated(el, binding, vnode, prevVnode) {
        console.log(el);
        console.log(binding);
        console.log(vnode);
        console.log(prevVnode);
      },
    },
  },
};
</script>

<template>
  <button @click="n = 10">更新n的值</button>
  <button @click="message = 'Hello Vue'">更新message的值</button>
  <!--:input为指令参数  .radius为指令修饰符  n变量的值为传递给指令的值-->
  <input type="text" v-focus:input.radius="n" />
  <div>{{ message }}</div>
</template>
当点击更新 n 的值按扭时,会在控制台打印如下内容。

当添加更新 message 的值按扭时,
updated钩子也会调用,在控制台打印如下内容。

注意事项
并不是更新与自定义指令相关的数据才会调用自定义指令钩子,只要是响应式数据更新,需要重新渲染模板,就会调用自定义指令对应的 beforeUpdate 和 updated 钩子。
# 5、v-focus 指令添加参数与修饰符
TIP
自定义v-focus:input.radius=n指令
- 参数如果为
input,元素要获取焦点,然后背景变成skyblue色 - 如果参数为
button,元素背景变为orange橘色 - 修饰符
radius表示给元素边框添加圆角效果,指令后面的值n为边框圆角的半径
<script>
export default {
  data() {
    return {
      n: 5,
    };
  },
  // 所有指令,都需要在这里定义(注册)
  directives: {
    focus: {
      // 在绑定元素的父组件
      // 及他自己的所有子节点都挂载完成后调用
      mounted(el, binding, vnode, prevVnode) {
        if (binding.arg === "input") {
          el.focus();
          el.style.backgroundColor = "skyblue";
        }
        if (binding.arg === "button") {
          el.style.backgroundColor = "orange";
        }
        if (binding.modifiers.radius) {
          el.style.borderRadius = binding.value + "px";
        }
      },
    },
  },
};
</script>

<template>
  <button @click="n = 30">圆角变大</button>
  <button type="text" v-focus:button.radius="n">提交按扭</button>
  <input type="text" v-focus:input.radius="n" />
</template>
以上代码最终渲染效果如下:

注:
当我们点击按扭,想让圆角变小时,发现并没有效果,但是数据num确实变成了30。为什么数据变了,元素没有同步更新呢 ?
原因在于我们要执行的指令代码,定义在v-focus指令的mounted钩子函数中,mounted钩子函数只会在初次渲染 DOM 挂载成功后才会被执行,后面数据更新,并不会执行。
所以想要数据更新后,执行对应的代码,让圆角变小,需要在
beforeUpdate或updated中执行相关代码
# 5.1、v-focus 指令优化版
TIP
接下来,我们在beforeUpdate或updated钩子中执行相关代码,来解决上面存在的问题。
<script>
export default {
  data() {
    return {
      n: 5,
    };
  },
  // 所有指令,都需要在这里定义(注册)
  directives: {
    focus: {
      // 在绑定元素的父组件
      // 及他自己的所有子节点都挂载完成后调用
      mounted(el, binding, vnode, prevVnode) {
        if (binding.arg === "input") {
          el.focus();
          el.style.backgroundColor = "skyblue";
        }
        if (binding.arg === "button") {
          el.style.backgroundColor = "orange";
        }
        if (binding.modifiers.radius) {
          el.style.borderRadius = binding.value + "px";
        }
      },
      updated(el, binding) {
        if (binding.arg === "input") {
          el.focus();
          el.style.backgroundColor = "skyblue";
        }
        if (binding.arg === "button") {
          el.style.backgroundColor = "orange";
        }
        if (binding.modifiers.radius) {
          el.style.borderRadius = binding.value + "px";
        }
      },
    },
  },
};
</script>

<template>
  <button @click="n = 30">圆角变大</button> |
  <button type="text" v-focus:button.radius="n">提交按扭</button> |
  <input type="text" v-focus:input.radius="n" />
</template>
以上代码最终渲染效果如下,点击圆角变大按扭后,元素的圆角确实变大了。

# 6、自定义指令函数写法
TIP
对于自定义指令来说,一个很常见的情况是仅仅需要在 mounted 和 updated 上实现相同的行为,除此之外并不需要其他钩子,这种情况下我们可以直接用一个函数来定义指令。
如下:
 directives: {
	 // 以下函数式写法,就相当于focus函数中代码会在mounted与updated钩子中被调用。
    focus(el, binding,vnode, prevVnode) {}
  }
用简写形式来优化上面
v-focus指令的代码,如下:
<script>
export default {
  data() {
    return {
      n: 5,
    };
  },
  // 所有指令,都需要在这里定义(注册)
  directives: {
    focus(el, binding, vnode, prevVnode) {
      if (binding.arg === "input") {
        el.focus();
        el.style.backgroundColor = "skyblue";
      }
      if (binding.arg === "button") {
        el.style.backgroundColor = "orange";
      }
      if (binding.modifiers.radius) {
        el.style.borderRadius = binding.value + "px";
      }
    },
  },
};
</script>

<template>
  <button @click="n = 30">圆角变大</button> |
  <button type="text" v-focus:button.radius="n">提交按扭</button> |
  <input type="text" v-focus:input.radius="n" />
</template>
以上代码最终执行后效果如下:
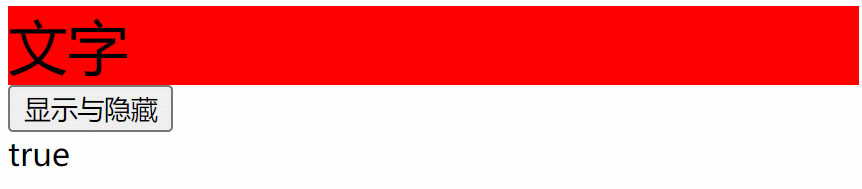
# 7、自定义 v-style 和 v-display 指令
TIP
v-style指令后面的值为一个 CSS 样式对象,用来给元素添加对应的 style 样式v-display指令的效果同 Vue 内置的v-show指令效果一样,当值为 true 时,元素显示,值为 false 时,隐藏元素。
指令绑定的值
如果你的指令需要多个值,你可以向它传递一个 JavaScript 对象字面量
指令也可以接收任何合法的 JavaScript 表达式
代码演示
<script>
  export default {
    data() {
      return {
        bool: true,
      };
    },
    methods: {
      getType(x) {
        var originType = Object.prototype.toString.call(x); //'[object type]'
        var spaceIndex = originType.indexOf(" "); // 查找空隙所在下标
        var type = originType.slice(spaceIndex + 1, -1); //从空格下标+1位位置查询字符串,查询到字符串最后一位
        return type.toLowerCase(); //将分格出来的类型,统一转成小写字
      },
    },
    directives: {
      display(el, binding) {
        if (binding.value) {
          el.style.display = "block";
        } else {
          el.style.display = "none";
        }
      },
      style(el, binding) {
        const that = binding.instance; // 组件实例
        // 判断传递的参数是否存在,如果存在,再判断值是否是一个对象
        if (binding.value && that.getType(binding.value) === "object") {
          for (let key in binding.value) {
            el.style[key] = binding.value[key];
          }
        }
      },
    },
  };
</script>

<template>
  <div v-style="{ fontSize: '30px', backgroundColor: 'red' }">文字</div>
  <button @click="bool = !bool">显示与隐藏</button>
  <div v-display="bool">{{ bool }}</div>
</template>
最终渲染后效果如下:
# 8、自定义全局指令
TIP
Vue 中的指令分为局部指令和全局指令。
- 局部指令: 我们在组件的
directives选项中注册的指令为局部指令,这种方式注册的指令只能供当前组件使用 - 全局指令: 调用
app.directive()方法来注册的指令称为全局指令。这种方式注册的指令可以在任意的组件中使用。
# 8.1、app.directive 方法
TIP
app.directive()方法可以用来注册一个全局指令,也可以根据指令名返回注册的指令(如果存在的话)
注册一个全局指令
/*
	name:指令的名字
	directive:指令定义,值是一个对象或一个函数,写法与局部指令的对象和函数写法一模一样
	返回值应用实例 app,则支持链式调用
*/
app.directive(name: string, directive: Directive): this
根据指令名返回该指令
// name:已注册的全局指令的名字,最终返回该名子注册的指令,如果不存在返回undefined
app.directive(name: string): Directive | undefined
示例
import { createApp } from "vue";
import App from "./App.vue";
const app = createApp(App);

// 注册全局指令v-focus (对象形式的指令)
app.directive("focus", {
  /*  自定义钩子  */
});

// 注册全局指令 v-display (函数形式的写法)
app.directive("display", (el, binding) => {
  /*  执行代码  */
});

// 得到一个已注册的指令
const myDirective = app.directive("focus");

app.mount("#app");
# 8.2、注册全局指令 v-focus
TIP
v-focus指令用于实现当input输入框插入页面后获取焦点同时背景颜色变为skyblue
main.js文件中注册全局指令
import { createApp } from 'vue'
import App from './App.vue'
const app = createApp(App);

// 注册全局指令 (对象形式的指令)
// app.directive("focus", {
//     mounted(el, binding) {
//         el.focus();
//         el.style.backgroundColor = "skyblue"
//     },
//     updated(el, binding) {
//         el.focus();
//         el.style.backgroundColor = "skyblue"
//     }
// })

// 注册全局指令 (函数形式的写法)
app.directive('focus', (el, binding) => {
    el.focus();
    el.style.backgroundColor = "skyblue"
})

// 得到一个已注册的指令, 实际开发中几乎用不到
consty myDirective=app.directive("focus");

const vm = app.mount('#app');
App.vue中使用全局指令
<script>
import Hello from "./components/Hello.vue";
export default {
  components: {
    Hello,
  },
};
</script>

<template>
  <h3>App根组件</h3>
  <input type="text" v-my-focus />
  <input type="text" v-new-focus />
  <Hello></Hello>
</template>
Hello.vue子组件中使用全局指令
<script></script>

<template>
  <h3>Hello 子组件中</h3>
  <input type="text" v-my-focus />
</template>
以上案例,最终编译后,显示效果如下:
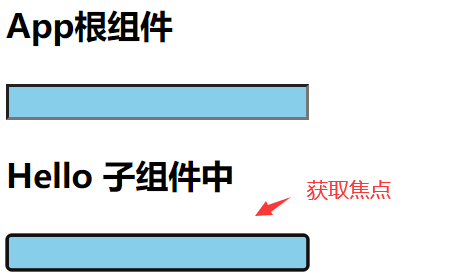
注:
一个页面中,只能有一个元素获取到焦点,所以这里只能是子组件中的input获取到焦点。
# 9、总结
TIP
关于自定义指令,以下内容是我们需要重点掌握的。
自定义指令的分类
- 自定义指令分为全局指令与局部指令。
- 直接在
directives选项中注册的指令为局部指令,只能用于注册该指令的组件 - 通过
app.directive方法注册的指令为局部指令,可以在任意的组件中使用
注册局部指令
局部指令有对象与函数两种写法
- 对象写法: 根据需要添加对应的钩子函数
- 函数简写形式 : 写在函数中的代码相当于定义在
mounted与updated钩子中
// 注册局部指令,对象形式的写法
directives:{
    myDirective:{
        /* 自定义钩子 */
        mounted(){ },
        // .....
    }
}

// 注册局部指令,函数形式的写法
directives:{
    myDirective(){
        /* 自定义代码 */
    }
}
注册全局指令
自定义全局指令,也包含对象与函数两种写法
// 注册全局指令 (对象形式的写法)
app.directive("my-focus", {
  /*  自定义钩子  */
});

// 注册全局指令 (函数形式的写法)
app.directive("my-focus", (el, binding) => {
  /*  执行代码  */
});
指令钩子参数
mounted(el,binding,vnode,prevNode) { }
注意事项
- 自定义指令钩子中
this指向undefined - 自定义指令的值可以是一个表达式,如果有多个值可以写成对象形式
# 三、自定义指令:实战应用
TIP
深入浅出自定义指令:
- v-debounce 防抖指令
- v-drag 元素拖拽指令
- v-LazyLoad 图片懒加载指令
- IntersectionObserver 构造函数
- IntersectionObserverEntry 对象
- 实现图片懒加载
... 等实践应用
# 1、自定义 v-debounce 防抖指令
TIP
什么是防抖
- 是指只有在间隔时间达到规定时间后才会执行一次真正的事件处理函数
- 如果在规定时间内再次触发事件,则会重新计时。
v-debounce防抖指令
- 指令参数用来指定绑定的事件类型,如:input 事件 click 事件
- 指令值是一个对像,对象的
eventName属性值为事件处理函数delay为防抖时间,单位为 ms,如果没有该属性默认值为 300ms
<input v-model="text" v-debounce:input="{ eventName: search, delay: 1000 }" />
以上代码,使用
v-debounce指令后效果如下:

完整版代码
在/src/commont/directive.js文件创建注册指令的directives方法
// directives方法,用来注册相关全局指令。方法的参数app为应用实例
export const directives = (app) => {
  // 注册防抖指令
  app.directive("debounce", {
    created(el, binding) {
      if (typeof binding.value.eventName !== "function") return;
      el.timer = null;
      el.handler = function () {
        if (el.timer) {
          clearTimeout(el.timer);
        }
        el.timer = setTimeout(() => {
          el.timer = null;
          // this指向 el  arguments中包含事件对象
          binding.value.eventName.apply(this, arguments);
        }, binding.value.delay || 300);
      };
      // 为元素添加click事件监听
      el.addEventListener(binding.arg, el.handler);
    },
  });
};
在main.js中调用directives方法,注册全局指令v-debounce
import { createApp } from "vue";
import App from "./App.vue";
// 导入 directives方法
import { directives } from "./commont/directive";
const app = createApp(App);
// 注册全局指令
directives(app);

app.mount("#app");
在App.vue组件中使用v-debounce指令
<input v-model="text" v-debounce:input="{ eventName: search, delay: 1000 }" />
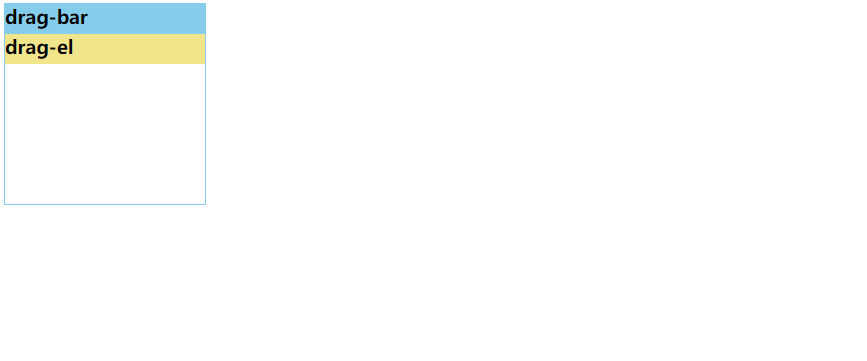
# 2、自定义 v-drag 元素拖拽指令
TIP
自定义v-drag拖拽指令
- 修饰符
self表示添加v-drag指令元素为被拖拽的元素 - 如果没有添加
self修饰符,则表示被拽的元素为其父元素
<div class="drag">
  <!--在 drag-bar上按下,被拖拽的元素为 drag-->
  <h3 class="drag-bar" v-drag>drag-bar</h3>
  <!--在 drag-el上按下,被拖拽的元素为 drag-el自身-->
  <h3 class="drag-el" v-drag.self>drag-el</h3>
</div>
以上代码效果如下:
拖拽动画的实现原理如下图

实现步骤:
!%5Bimage-20221013202829968%5D(C:/Users/EDY/Desktop/image-20221013202829968.png))
在鼠标按下时,即 onmousedown 事件
- 记录鼠标按下时与浏览器可视区左边和上边距离,即
e.clientX和e.clientY - 同时记录被拖拽元素与定义父元素左边的距离,即
drag.offsetLeft和drag.offsetTop
在鼠标标移动时,即 onmousemove 事件
- 记录鼠标此时与浏览器可视区左边和上边距离,即
e.clientX和e.clientY - 用当前的
e.clientX- 鼠标按下时e.clientX,得到鼠标在水平移动的距离,然后用这个距离加上移动前元素的 offsetLeft,就得到了此时被拖拽元素的 left 值。同得理得 top 值
还要添加 onmouseup 事件,在鼠标抬起时,要解绑 onmousemove 和 onmouseup 事件
以上步骤实现了元素可以自由的被拖拽,但是并不能控制元素只能在定位父元素容器中移动
控制被拖拽元素移动时不能超出父容器,我们只需要控制被拖拽元素的 left 和 top 值的大小
- 如果
left < 0,表示超出了父容器左边界,此时设置left = 0,强行拉回 - 如果
left > 父容器宽 - 元素宽,表示超出了父容器右边界,此时设置left = 父容器宽 - 元素宽,强行拉回 - 如果
top < 0,表示超出了父容器上边界,此时设置top = 0,强行拉回 - 如果
top > 父容器高 - 元素高,表示超出了父容器下边界,此时设置top = 父容器宽 - 元素宽,强行拉回
以上步骤,实现了控制元素只能在父容器中移动
- 兼容性处理:如果被拖拽的元素是一个图片,或元素中有文字,被拖拽时就会出现卡顿
- 处理办法,就是禁止掉鼠标按下时,图片和被选中的文字默认的拖拽行为。
e.preventDefault();
完整版代码
- 在
/src/commont/directive.js文件创建注册指令的directives方法
// 注册全局指令
export const directives = (app) => {
  // 注册拖拽指令
  app.directive("drag", {
    mounted(el, binding) {
      // 鼠标按下时执行的函数
      el.mouseDown = function () {
        var e = e || window.event;
        // 取消事件的默认行为
        e.preventDefault();
        // 真正被拖动的是按下元素的父元素
        const parent = this.parentNode;

        // 鼠标按下时,按下位置与浏览器左边的距离和上面的距离
        var _clientX = e.clientX;
        var _clientY = e.clientY;

        // 获鼠标按下时,被拖拽元素与定位父元素的top与left值
        var _offsetTop = parent.offsetTop;
        var _offsetLeft = parent.offsetLeft;

        // 被拖拽的元素的宽和高
        var dragWidth = parent.offsetWidth;
        var dragHeight = parent.offsetHeight;

        // 被拖拽元素的定位父元素的可视宽和高
        var parentWidth = parent.offsetParent.clientWidth;
        var parentHeight = parent.offsetParent.clientHeight;

        // 计算元素能移动的最大left值和最大top值
        var maxLeft = parentWidth - dragWidth;
        var maxTop = parentHeight - dragHeight;

        (document.onmousemove = (e) => {
          // 鼠标移动时,与浏览器可视区左边的距离
          var _moveClientX = e.clientX;
          var _moveClientY = e.clientY;

          // 计算鼠标移动的距离
          var _x = _moveClientX - _clientX;
          var _y = _moveClientY - _clientY;

          // 元素的left和top值
          var left = _x + _offsetLeft;
          var top = _y + _offsetTop;

          // 限定left只能在 0-maxLeft之间
          left = left < 0 ? 0 : left;
          left = left > maxLeft ? maxLeft : left;

          top = top < 0 ? 0 : top;
          top = top > maxTop ? maxTop : top;
          // 计算元素当前的位置
          parent.style.left = left + "px";
          parent.style.top = top + "px";
        }),
          // 当鼠标弹起来时,要对事件解绑
          (document.onmouseup = function () {
            document.onmousemove = null;
            document.onmouseup = null;
          });
      };
      // 绑定事件
      el.addEventListener("mousedown", el.mouseDown);
    },
  });
};
- 在
main.js中调用directives方法,注册全局指令v-drag指令
import { createApp } from "vue";
import App from "./App.vue";
// 导入 directives方法
import { directives } from "./commont/directive";
const app = createApp(App);
// 注册全局指令
directives(app);

app.mount("#app");
- 在
App.vue组件中使用
<template>
  <div class="drag">
    <!--在 drag-bar上按下,被拖拽的元素为 drag-->
    <h3 class="drag-bar" v-drag>drag-bar</h3>
    <!--在 drag-el上按下,被拖拽的元素为 drag-el自身-->
    <h3 class="drag-el" v-drag.self>drag-el</h3>
  </div>
</template>

<style>
  * {
    margin: 0;
    padding: 0;
  }

  html,
  body {
    margin: 0;
    padding: 0;
    width: 100%;
    height: 100%;
  }

  .drag {
    width: 300px;
    height: 200px;
    border: 1px solid skyblue;
    position: absolute;
  }

  .drag .drag-bar {
    height: 30px;
    background-color: skyblue;
  }

  .drag .drag-el {
    height: 30px;
    width: 100%;
    background-color: khaki;
    position: absolute;
  }
</style>
# 3、自定义 v-LazyLoad 图片懒加载指令
TIP
实现图片懒加载有很多种方式,最常见的就是以下两种
- 监听到
scroll事件后,调用目标元素的getBoundingClientRect()方法来实现。
- 通过
IntersectionObserverAPI 来实现,他可以自动"观察"元素是否可见。由于可见(visible)的本质是,目标元素与视口产生一个交叉区,所以这个 API 叫做"交叉口观测器"。
本次我们采用第二种方式,利用
IntersectionObserver构造函数来实现
# 3.1、IntersectionObserver 构造函数
TIP
IntersectionObserver是浏览器原生提供的构造函数,可以自动"观察"元素是否可见。
// 观察器实例
const io = new IntersectionObserver(callback, options);
参数
callback:是可见性变化时的回调函数。callback一般会触发两次,一次是目标元素刚刚进入视口(开始可见),另一次是完全离开视口(开始不可见)option:是配置对象(该参数可选)
返回值
构造函数的返回值是一个观察器实例
观察器实例方法
- 实例的
observe方法可以指定观察哪个 DOM 节点,如果需要观察多个节点,就需要多次调用observe方法 - 实例的
unobserve方法用于停止对某个元素的观察 - 实例的
disconnect方法用于关闭观察器
// 开始观察 box元素和container
io.observe(document.getElementById('box'));
io.observe(document.getElementById('container'));

// 停止观察 box元素
io.unobserve(document.getElementById('box')));

// 关闭观察器
io.disconnect();
代码示例
<script>
  export default {
    data() {
      return {
        io: null, // 观察实例
      };
    },
    methods: {
      stop() {
        this.io.unobserve(document.getElementById("box"));
      },
    },
    mounted() {
      // 创建观察者实例
      this.io = new IntersectionObserver(() => {
        console.log("元素进入或离开可视区,我就会被打印");
      });
      // 开始观察 #box元素
      this.io.observe(document.getElementById("box"));
    },
  };
</script>

<template>
  <button @click="stop">停止</button>
  <div class="h1000"></div>
  <div id="box">
    <img src="./assets/images/01.png" alt="" />
  </div>
  <div class="h1000"></div>
</template>

<style>
  .h1000 {
    height: 1000px;
  }
</style>
以上代码最终渲染效果如下:
注:
注意观察图下右边控制台的打印输出,当元素进入或离开可视区时callback回调函数都会被调用,右边控制台输出对应信息。
当点击停止按扭停止侦听时,不管元素进入还是离开可视区,图下右边的控制台都不会有新的输出。

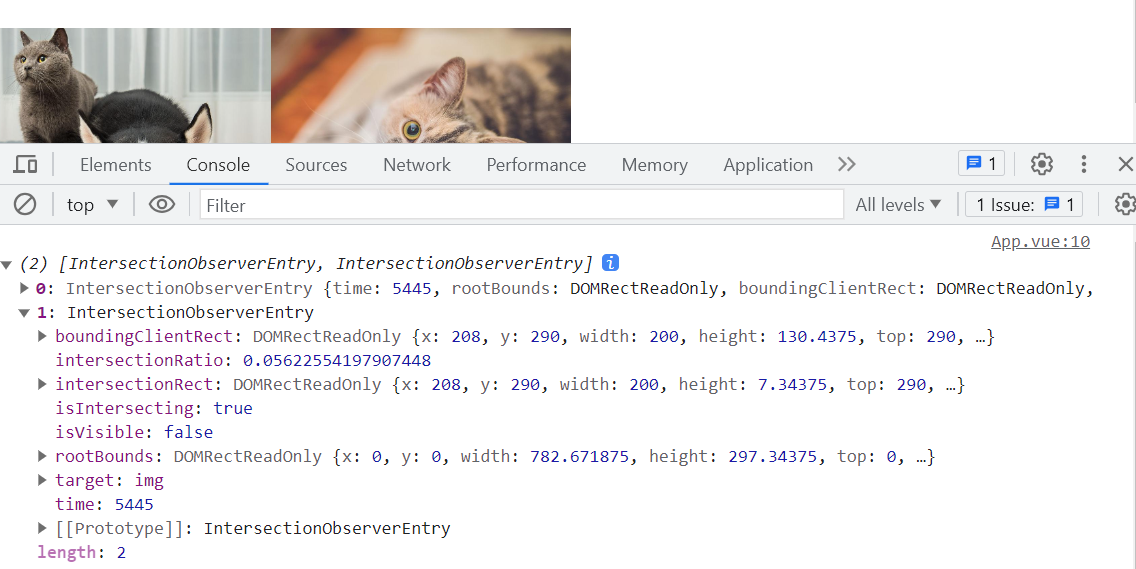
# 3.2、IntersectionObserverEntry 对象
TIP
callback函数的第一个参数是一个数组,数组中的每个成员是一个IntersectionObserverEntry对象。如果同时有两个被观察的对象的可见性发生变化,entries数组就会有两个成员
IntersectionObserverEntry对象提供目标元素的信息,他主要有以下 7 个属性
time:可见性发生变化的时间(可见到不可见的时间间隔),是一个高精度时间戳,单位为毫秒target:被观察的目标元素,是一个 DOM 节点对象rootBounds:根元素的矩形区域的信息,getBoundingClientRect()方法的返回值,如果没有根元素(即直接相对于视口滚动),则返回nullboundingClientRect:目标元素的矩形区域的信息intersectionRect:目标元素与视口(或根元素)的交叉区域的信息intersectionRatio:目标元素的可见比例,即intersectionRect占boundingClientRect的比例,完全可见时为1,完全不可见时小于等于0isIntersecting:返回一个布尔值,如果目标元素与交叉区域观察者对象(intersection observer)的根相交,则返回true。如果返回true, 则IntersectionObserverEntry描述了变换到交叉时的状态; 如果返回false, 那么可以由此判断,变换是从交叉状态到非交叉状态。
<script>
  export default {
    data() {
      return {
        io: null, // 观察实例
      };
    },
    mounted() {
      this.io = new IntersectionObserver((entries) => {
        console.log(entries);
      });
      // 开始观察  多个元素
      const imgList = document.querySelectorAll("#box img");
      imgList.forEach((img) => {
        this.io.observe(img);
      });
    },
  };
</script>

<template>
  <div class="h1000"></div>
  <div id="box">
    <img src="./assets/images/01.png" alt="" />
    <img src="./assets/images/02.png" alt="" />
  </div>
</template>

<style>
  #box {
    display: flex;
  }

  #box img {
    width: 200px;
  }

  .h1000 {
    height: 1000px;
  }
</style>
当图片部分进入可视区时,
IntersectionObserverEntry对象中属性的值如下:
# 3.3、IntersectionObserver 实现图片懒加载

<script>
  export default {
    data() {
      return {
        io: null, // 观察实例,
        imgList: [
          "/src/assets/images/01.png",
          "/src/assets/images/02.png",
          "/src/assets/images/03.png",
          "/src/assets/images/04.png",
          "/src/assets/images/05.png",
          "/src/assets/images/06.png",
          "/src/assets/images/07.png",
          "/src/assets/images/08.png",
        ],
      };
    },
    mounted() {
      this.io = new IntersectionObserver((entries) => {
        for (var i = 0; i < entries.length; i++) {
          // 元素没有出现在可视区,不做任何处理
          if (entries[i].intersectionRatio <= 0) continue;
          const img = entries[i].target;
          // 定时器用来模拟延时效果,实际开发中需要去掉
          setTimeout(() => {
            img.src = img.dataset.src;
          }, 1000);

          // 停止观察
          this.io.unobserve(img);
        }
      });
      // 开始观察  多个元素
      const imgList = document.querySelectorAll("#box img");
      imgList.forEach((img) => {
        this.io.observe(img);
      });
    },
  };
</script>

<template>
  <div class="h1000"></div>
  <ul id="box">
    <li v-for="item in imgList">
      <img :data-src="item" alt="" />
    </li>
  </ul>
</template>

<style>
  * {
    margin: 0;
    padding: 0;
  }

  #box {
    max-width: 600px;
    margin: 0px auto;
    list-style: none;
  }

  #box li {
    width: 290px;
    height: 189px;
    margin: 5px;
    background-color: #ddd;
    float: left;
  }

  #box li img {
    width: inherit;
    height: inherit;
  }

  .h1000 {
    height: 1000px;
  }
</style>
# 3.4、options 选项
TIP
root:指定根元素,用于检查目标的可见性。必须是目标元素的父级元素。如果未指定或者为 null,则默认为浏览器视窗。rootMargin:根元素的外边距,类似于 CSS 中的 margin 属性,如:“200px 200px 200px 200px"。 如果 margin-left 值为 200px,则rootBounds的矩形区的宽度会变大 200px。threshold:目标元素与根元素的交叉比例,可以是单一的 number 也可以是 number 数组,比如,[0, 0.25, 0.5, 0.75, 1]就表示当目标元素0%、25%、50%、75%、100%可见时,会触发回调函数。
{
    // options配置
    // 指定根元素,  目标元素的可见性是相对于根元素而言
    root: document.getElementById('box'),
    // 根元素的外边距 如果为正,相当根元素矩形区外扩,否则相当于内缩
    rootMargin: "-200px 0px 0px 0px",
    // 目标元素与根元素的交叉比例
    threshold: 1,
}
代码示例
<script>
  export default {
    data() {
      return {
        io: null, // 观察实例,
        imgList: [
          "/src/assets/images/01.png",
          "/src/assets/images/02.png",
          "/src/assets/images/03.png",
          "/src/assets/images/04.png",
          "/src/assets/images/05.png",
          "/src/assets/images/06.png",
          "/src/assets/images/07.png",
          "/src/assets/images/08.png",
        ],
      };
    },
    mounted() {
      this.io = new IntersectionObserver(
        (entries) => {
          for (var i = 0; i < entries.length; i++) {
            // 元素没有出现在可视区,不做任何处理
            if (entries[i].intersectionRatio <= 0) continue;
            const img = entries[i].target;
            // 定时器用来模拟延时效果,实际开发中需要去掉
            setTimeout(() => {
              img.src = img.dataset.src;
            }, 1000);

            // 停止观察
            this.io.unobserve(img);
          }
        },
        {
          // options配置
          // 指定根元素,  目标元素的可见性是相对于根元素而言
          root: document.getElementById("box"),
          // 根元素的外边距 如果为正,相当根元素矩形区外扩,否则相当于内缩
          rootMargin: "-200px 0px 0px 0px",
          // 目标元素与根元素的交叉比例
          threshold: 1,
        }
      );
      // 开始观察  多个元素
      const imgList = document.querySelectorAll("#box img");
      imgList.forEach((img) => {
        this.io.observe(img);
      });
    },
  };
</script>

<template>
  <div class="h1000"></div>
  <ul id="box">
    <li v-for="item in imgList">
      <img :data-src="item" alt="" />
    </li>
  </ul>
</template>

<style>
  * {
    margin: 0;
    padding: 0;
  }

  #box {
    width: 600px;
    /*  出现滚动条,则只有出现在滚动区域才显示
        height: 400px;
    	overflow-y: auto;
        */
    margin: 0px auto;
    list-style: none;
    display: flex;
    flex-wrap: wrap;
  }

  #box li {
    width: 290px;
    height: 189px;
    margin: 5px;
    background-color: #ddd;
  }

  #box li img {
    width: inherit;
    height: inherit;
  }

  .h1000 {
    height: 1000px;
  }
</style>
以上代码添加了
options选项后,最终渲染效果如下:
你会发现第一排图片元素永远都不会显示,而其它的图片元素一上来就全部显示了

# 3.5、v-lazy 指令实现图片懒加载
在/src/commont/directive.js文件中创建注册指令的directives方法
export const directives = (app) => {
  // 注册v-lazy懒加载指令
  app.directive("lazy", (el, binding) => {
    const io = new IntersectionObserver((entries) => {
      if (entries[0].intersectionRatio <= 0) return;
      setTimeout(() => {
        el.src = entries[0].target.dataset.src;
      }, 1000);

      // 取消监听
      io.unobserve(el);
      // 关闭观察器
      io.disconnect();
    });
    // 添加监听元素
    io.observe(el);
  });
};
在main.js中调用directives方法,注册全局指令v-lazy指令
import { createApp } from "vue";
import App from "./App.vue";
// 导入 directives方法
import { directives } from "./commont/directive";
const app = createApp(App);
// 注册全局指令
directives(app);

app.mount("#app");
App.vue组件中应用
<script>
  export default {
    data() {
      return {
        imgList: [
          "/src/assets/images/01.png",
          "/src/assets/images/02.png",
          "/src/assets/images/03.png",
          "/src/assets/images/04.png",
          "/src/assets/images/05.png",
          "/src/assets/images/06.png",
          "/src/assets/images/07.png",
          "/src/assets/images/08.png",
        ],
      };
    },
  };
</script>

<template>
  <div class="h1000"></div>
  <ul id="box">
    <li v-for="item in imgList">
      <img v-lazy :data-src="item" />
    </li>
  </ul>
</template>

<style>
  * {
    margin: 0;
    padding: 0;
  }

  #box {
    max-width: 600px;
    margin: 0px auto;
    list-style: none;
  }

  #box li {
    width: 290px;
    height: 189px;
    margin: 5px;
    background-color: #ddd;
    float: left;
  }

  #box li img {
    width: inherit;
    height: inherit;
  }

  .h1000 {
    height: 1000px;
  }
</style>
# 四、模板引用 - ref 属性
TIP
我们之所以会选择 Vue 框架,是因为 Vue 框架帮我们做了大部分的 DOM 操作,我们只需要关注逻辑层的处理。但在某些情况下,我们仍然需要直接访问底层的 DOM 元素。
在 Vue 中访问底层的 DOM 元素,我们有以下两种办法:
- 通过原生 JS 访问 DOM,比如:
document.getElementById()或document.querySelectorAll()等更多方法 - 通过 Vue 为我们提供了一个特殊的
ref属性,它允许我们在一个特定的 DOM 元素或子组件实例被挂载后,获得对它的直接引用。
# 1、原生 JS 访问 DOM
TIP
在生命周期函数mounted中获取id = box的元素,然后在控制台输出。
如下
<script>
export default {
  data() {
    return {
      message: "Hello Vue!!",
    };
  },
  mounted() {
    const box = document.getElementById("box");
    console.log(box);
  },
};
</script>

<template>
  <div id="box">{{ message }}</div>
</template>

注:
不过 Vue 框架本身是希望我们不要去关注 DOM 的操作,如果我们又用原生 JS 的方式来获取 DOM 是违背了 Vue 框架的初衷。
所以在 Vue 中要获取对 DOM 的引用,主要还是通过
ref属性来实现。
# 2、ref 属性
TIP
当我们需要访问某个 DOM 元素时,我们可以在该元素上添加ref属性,如:ref='box',然后就可以通过this.$refs.box访问到该 DOM 元素。
注意:
只有在 DOM 元素或子组件实例被挂载后,才能通过this.$refs.xxx方式访问到该元素或子组件实例。
代码演示
<script>
  export default {
    data() {
      return {
        message: "Hello Vue!!",
      };
    },
    mounted() {
      console.log(this.$refs.box);
    },
  };
</script>

<template>
  <div ref="box">{{ message }}</div>
</template>

# 3、ref 的唯一性
TIP
ref属性更像是id属性的替代者,页面中不同出现相同的ref值。如果出现相同的,则以后面的为主。
<script>
  export default {
    data() {
      return {
        message: "Hello Vue!!",
      };
    },
    mounted() {
      console.log(this.$refs);
      console.log(this.$refs.box);
      console.log(this.$refs.main);
    },
  };
</script>

<template>
  <div ref="box" class="box1">box1内容</div>
  <div ref="box" class="box2">box2内容</div>
  <div ref="main">main内容</div>
</template>
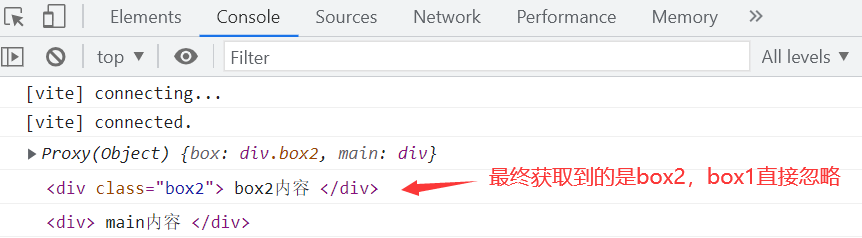
注:
通过上面打印结果,我们知道this.$refs是一个包含 DOM 元素的对象,对象的属性名为ref对应的值,属性值为ref所绑定的 DOM 元素。
# 4、v-for中的模板引用
TIP
当我们在一个包含v-for指令的元素上,添加了ref='xxx'属性时,最终this.$refs.xxx得到的值是一个数组,数组中每一项为v-for指令遍历后生成的 DOM 元素。
<script>
  export default {
    data() {
      return {
        arr: [1, 2, 3, 4],
      };
    },
    mounted() {
      console.log(this.$refs.items);
    },
  };
</script>

<template>
  <ul>
    <li v-for="item in arr" ref="items">{{ item }}</li>
  </ul>
</template>
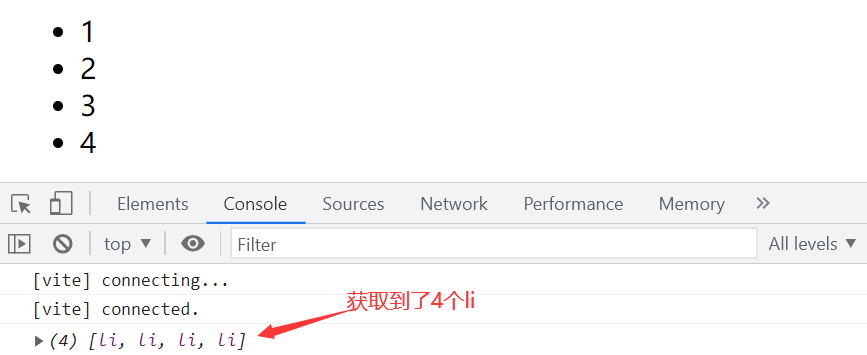
注意事项:
上面this.$refs.items得到的数组并不保证与源数组相同的顺序
# 5、组件上的 ref
TIP
当我们在一个子组件上添加ref = xxx属性时,最终通过this.$refs.xxx得到的值是组件实例。
如果我们给子组件添加id属性,通过原生 JS 方式获取该组件,得到的是组件的 DOM 元素。(该组件的根元素必需为单个元素时才可以,否则不行,这涉及到透传属性,后面会讲到,这里暂不介绍)。
App.vue文件内容
<script>
  import Hello from "./components/Hello.vue";
  export default {
    components: {
      Hello,
    },
    data() {
      return {
        arr: [1, 2, 3, 4],
      };
    },
    mounted() {
      console.log("ref方式:", this.$refs.text);
      console.log("id方式:", document.getElementById("box"));
    },
  };
</script>

<template>
  <Hello ref="text" id="box"></Hello>
</template>
Hello.vue文件内容
<script>
  export default {
    data() {
      return {
        message: "Hello 子组件",
      };
    },
  };
</script>

<template>
  <div>
    <h3>{{ message }}</h3>
    <div>子组件中div</div>
  </div>
</template>
最终代码执行后,在控制台输出结果如下:
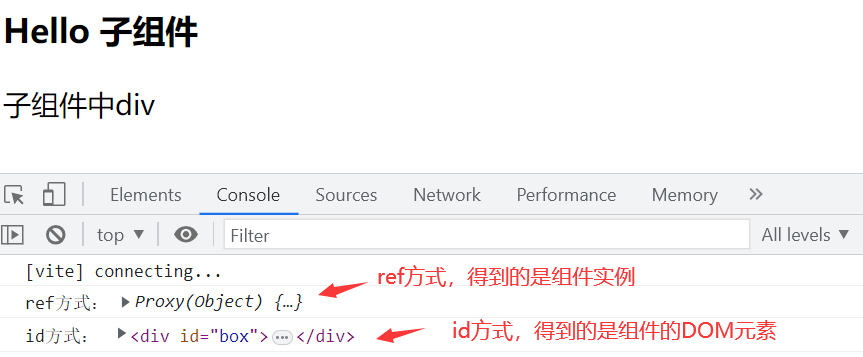
注:
通过上面代码,我们知道在子组件上添加ref = xxx属性,则在父组件中,可以通过this.$refs.xxx得到子组件实例。也就意味着在父组件中可以访问到子组件实例上的所有属性,这显然不是我们希望看到的。
如果我们只希望在父组件中访问子组件中允许我们访问的一些属性,那我们可以通过expose选项来对外暴露一些公共属性。
# 5、expose 选项
TIP
- 如果没有
expose选项,默认在父组件中可以通过模板引用访问子组件实例的所有方法和属性 expose选项用于声明当组件实例被父组件通过模板引用访问时暴露的公共属性。只有出现在expose选项中的属性和方法才能在父组件中访问到。expose选项值应当是一个包含要暴露的属性名称字符串的数组。
export default {
  // 子组件对外暴露的公开属性
  expose: ["publicData", "publicMethod"],
};
应用场景
如果你创建了某个组件,而这个组件需要对外暴露一些公开的属性和方法,但又希望组件其它的属性和方法是私有的,则把公开属性在expose选项中声明。
代码示例
App.vue根组件
<script>
  import Hello from "./components/Hello.vue";
  export default {
    components: {
      Hello,
    },
    mounted() {
      // 获取子组件实例
      const child = this.$refs.text;
      // 访问子组件实例对外暴露的公开属性和方法
      console.log(child.publicData);
      if (child.publicMethod) {
        child.publicMethod();
      }

      // 以下为子组件实例的私有属性和方法,则无法访问
      console.log(child.privateData); // undefined
      if (child.privateMethod) {
        child.privateMethod();
      } //  undefined
    },
  };
</script>

<template>
  <Hello ref="text" id="box"></Hello>
</template>
Hello.vue 子组件
<script>
  export default {
    // 子组件对外暴露的公开属性
    expose: ["publicData", "publicMethod"],
    data() {
      return {
        publicData: "公开的属性",
        privateData: "私有的,不能访问",
      };
    },
    methods: {
      publicMethod() {
        console.log("公开的方法");
      },
      privateMethod() {
        console.log("不对外的方法");
      },
    },
  };
</script>

<template>
  <div>
    <h3>{{ publicData }}</h3>
    <div>{{ privateData }}</div>
  </div>
</template>
注:
以上代码,最终执行后的结果如下:
在父组件中通过模板引用访问到子组件实例后,仅能访问到公开的属性publicData 和 publicMethod
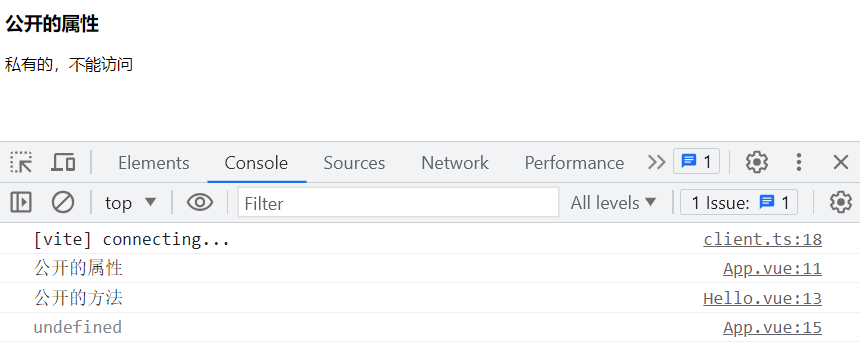
温馨提示
如果没有特殊的需求,父子组件通信,我们应该选择后面讲到的组件间通信的方式,如:props和 emit 接口等。
# 6、实战应用:计数器
开发
Count计时器组件,最终效果如下
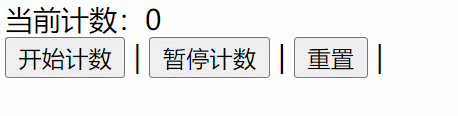
组件实例的和属性
| 实例属性 | 描述 | 私有或公开 |
|---|---|---|
| n | 用来保存当前计数 | 公开 |
| timer | 用来保存定时器 | 私有 |
组件实例的方法
| 实例方法 | 描述 | 私有或公开 |
|---|---|---|
| 方法 addInterval | 添加定时器 | 私有 |
| 方法 removeInterval | 移除定时器 | 私有 |
| 方法 start | 开始计数 | 公开 |
| 方法 end | 暂停计数 | 公开 |
| 方法 reset | 重置计数 | 公开 |
代码示例
App.vues根组件内容
<script>
  import Count from "./components/Count.vue";
  export default {
    components: {
      Count,
    },
    methods: {
      start() {
        this.$refs.instance.start();
      },
      end() {
        this.$refs.instance.end();
      },
      reset() {
        this.$refs.instance.reset();
      },
    },
  };
</script>

<template>
  <Count ref="instance"></Count>
  <button @click="start">开始计数</button>
  <button @click="end">暂停计数</button>
  <button @click="reset">重置</button>
</template>
Count.vue子组件
<script>
  export default {
    data() {
      return {
        n: 0,
        timer: null,
      };
    },
    // 对外暴露的方法和属性
    expose: ["start", "end", "reset", "n"],
    methods: {
      // 添加定时器
      addInterval() {
        if (this.timer) return;
        this.timer = setInterval(() => {
          this.n++;
        }, 1000);
      },
      // 清除定时器
      removeInterval() {
        if (this.timer) {
          clearInterval(this.timer);
          this.timer = null;
        }
      },
      // 开始计时
      start() {
        this.addInterval();
      },
      // 停止计时
      end() {
        this.removeInterval();
      },
      // 重置
      reset() {
        this.end();
        this.n = 0;
      },
    },
  };
</script>
<template>
  <div>当前计数:{{ n }}</div>
  <!--
        <button @click="start"> 开始计数 </button>
        <button @click="end"> 暂停计数</button>
        <button @click="reset"> 重置 </button>
	-->
</template>
# 五、nextTick 与 $nextTick
TIP
Vue 中 DOM 的更新是异步的,如果你想在数据更新后,获取到数据更新后的 DOM,你可以把相关的代码写在nextTick的回调函数中。
function nextTick(callback?: () => void): Promise<void>
当你在 Vue 中更改响应式状态时,最终的 DOM 更新并不是同步生效的,而是由 Vue 将它们缓存在一个队列中,直到下一个“tick”才一起执行。这样是为了确保每个组件无论发生多少状态改变,都仅执行一次更新。
要理解上面这段话,需要回答以下两个问题
- 如何理解 DOM 更新是异步的
- 下一次
tick指的是什么时候
# 1、DOM 更新是异步的
TIP
在 Vue 中,当响应式数据发生变化时,页面用到数据的地方也会发生变化,但并不是同步的,DOM 的更新是异步的。
也就是说,如果你一次更新多个数据,最终 DOM 只会更新一次,并不会在每个数据更新时,都更新下对应的 DOM。
代码示例
<script>
  export default {
    data() {
      return {
        n: 0,
      };
    },
    methods: {
      add() {
        for (let i = 1; i <= 100; i++) {
          this.n++;
        }
      },
    },
    watch: {
      n(newValue) {
        console.log(newValue);
      },
    },
  };
</script>

<template>
  <div>n的值:{{ n }}</div>
  <button @click="add">自增</button>
</template>
注:
以上代码中,我们为创建了watch侦听器来侦听n值的变化,当点击按扭时,n的值会按1,2,3,4...形式递增到 100。
如果说数据更新后,DOM 就要同步更新的话,那 DOM 要更新 100,同时侦听器回调函数也会被调用 100 次。但实际上 DOM 只更新了一次,并且侦听器也只调用了一次,侦听到的 n 值为 100。
# 1.1、DOM 更新是异步,带来的问题
TIP
因为 DOM 更新是异步的,所以我们想在数据更新后,立刻获取到更新后的 DOM,是没有办法获取到的。
<script>
  export default {
    data() {
      return {
        n: 0,
      };
    },
    methods: {
      add() {
        for (let i = 1; i <= 100; i++) {
          this.n++;
        }
        //  以下代码是在DOM更新前被执行
        console.log(this.$refs.box.innerHTML); // n的值:0
      },
    },
    watch: {
      n(newValue) {
        console.log(newValue);
      },
    },
  };
</script>

<template>
  <div ref="box">n的值:{{ n }}</div>
  <button @click="add">自增</button>
</template>

# 1.2、nextTick 中获取数据更新后 DOM
TIP
如果想在数据更新后,获取到更新后的 DOM,可以把相关代码放在在nextTick的回调函数中来执行,nextTick的回调函数会在 DOM 更新后调用。
<script>
  import { nextTick } from "vue";
  export default {
    data() {
      return {
        n: 0,
      };
    },
    methods: {
      add() {
        for (let i = 1; i <= 100; i++) {
          this.n++;
        }
        // nextTick中的代码是在DOM更新后执行
        nextTick(() => {
          console.log(this.$refs.box.innerHTML); //  n的值:100
        });
      },
    },
    watch: {
      n(newValue) {
        console.log(newValue);
      },
    },
  };
</script>

<template>
  <div ref="box">n的值:{{ n }}</div>
  <button @click="add">自增</button>
</template>
注:
正常情况下你了解到这里,对于后期什么情况下使用nextTick也是没有问题的了。
不过,我还是想给你继续来深入下来
nextTick的原理。
# 2、下一次 tick 指的是什么时候
TIP
要了解下一次tick是什么时候,我们需要知道何为一次tick,这就需要我们了解 JS 中的事件循环机制(Event Loop)
事件循环机制
JS 中的任务分为同步与异步,其中异步任务又分为:宏任务(Macro-take)和微任务(Micro-take)
| 宏任务 | 微任务 |
|---|---|
| script 标签(JS 整体代码)、setTimeout、setInterval、Ajax、DOM 事件 等 | Promise 的 then 和 catch 方法、MutaionObserver、async/await 等 |
TIP
JS 是单线程的,它是基于事件循环的,事件循环大致分为以下几个步骤
- 1、刚开始,调用栈空。微任务队列空,宏任务队列里有且只有一个 Script 脚本(整体 JS 代码)。这时首先执行的就是这个宏任务。(所以一开始程序执行时是没有微任务的)
- 2、整体代码作为宏任务进入调用栈,先执行同步代码,在执行的过程中遇到宏任务或微任务,就将他们加入分别加入到宏任务队列或微任务队列。
- 3、上一步的同步代码执行完后出栈,接着从微任务队列中取出微任务(先添加到微任务队列的先执行)并执行,在执行微任务过程中产生新的微任务,会添加到微任务队列,等微任务中的任务全部完成后,并不会马上执行宏任务,而是会进行 DOM 渲染
- 4、开始 DOM 渲染,把内容呈现在页面中,DOM 渲染结束。
- 5、接着从宏任务队列中取出宏任务(先加入到宏任务队列的先执行),并压入栈中执行。在执行宏任务时,也可能会产生新的宏任务和微任务。其执行过程重复上面操作。
以上不断重复的过程就叫做Event Loop(事件循环)
何为一次 tick
- 上面 1-3 的过程就算是一个
tick,从 5 开始又是一次新的tick,即为下一次tick。 - 上一
tick和下一次tick之间隔着一个 DOM 渲染。
nextTick 的执行时机
因为响发式状态发生变化时,DOM 并不是同步更新的,而是由Vue将它们缓存在一个队列中,所以在下一次tick时,先执行的是更新 DOM 的微任务,然后再执行nextTick的回调,nextTick的回调函数本质是在Promise的then方法中调用的,执行也的是一个微任务。
实际上这里提到的下一次tick是在步骤 4 前面执行的,因为他执行的是微任务。
所以 Vue 内部本质是同步的方式更新数据,DOM 更新在微任务中执行,
nextTick的回调也是在微任务中执行,只是在 DOM 更新后执行。
# 3、nextTick 的两种用法
TIP
nextTick 是一个全局方法,本质是创建一个异步任务,那么它自然要等到同步任务执行完成后才执行。
nextTick没有传递回调时,返回的是一个成功的PromisenextTick传入了回调函数,返回值是void,本质上回调函数会被传入promise的then方法中
// 以下是 nextTick的部分源码
const resolvedPromise = /*#__PURE__*/ Promise.resolve();
let currentFlushPromise = null;
function nextTick(fn) {
  const p = currentFlushPromise || resolvedPromise;
  return fn ? p.then(this ? fn.bind(this) : fn) : p;
}
所以我们可以通过以下两种方式来使用
nextTick方法
// 方法一
await nextTick();
// 所有需要在数据更新后获取更新的DOM操作都可以写在这里

// 方法二
nextTick(() => {
  // 所有需要在数据更新后获取更新的DOM操作都可以写在这里
});
代码示例
<script>
  import { nextTick } from "vue";
  export default {
    data() {
      return {
        n: 0,
      };
    },
    methods: {
      // 注意这里要加 async
      async add() {
        for (let i = 1; i <= 100; i++) {
          this.n++;
        }
        // nextTick()方法后的代码会在DOM更新后调用
        await nextTick();
        console.log(this.$refs.box.innerHTML); //  n的值:100
      },
    },
    watch: {
      n(newValue) {
        console.log(newValue);
      },
    },
  };
</script>

<template>
  <div ref="box">n的值:{{ n }}</div>
  <button @click="add">自增</button>
</template>
最终渲染后的执行结果如下:
# 4、$nextTick
绑定在实例上的 nextTick()函数
$nextTick(callback?: (this: ComponentPublicInstance) => void): Promise<void>
和全局版本的 nextTick() 的唯一区别就是组件传递给 this.$nextTick() 的回调函数会带上 this 上下文,其绑定了当前组件实例
await this.$nextTick(function () {
  console.log(this); // 当前组件实例
});

await nextTick(function () {
  console.log(this); // nudefined
});
代码示例
<script>
  import { nextTick } from "vue";
  export default {
    data() {
      return {
        n: 0,
      };
    },
    methods: {
      // 注意这里要加 async
      async add() {
        for (let i = 1; i <= 100; i++) {
          this.n++;
        }
        /*
                以下代码会抛出错误,因为this为undefined
             await nextTick(function () {
                 console.log(this.$refs.box.innerHTML)
             })
             */

        await this.$nextTick(() => [
          console.log(this.$refs.box.innerHTML), //  n的值:100
        ]);
      },
    },
    watch: {
      n(newValue) {
        console.log(newValue);
      },
    },
  };
</script>

<template>
  <div ref="box">n的值:{{ n }}</div>
  <button @click="add">自增</button>
</template>
如果只看这个案例,你可能会认为只要有$nextTick这个方法就可以了,没必要再弄个全局的nextTick,因为nextTick的用法与$nextTick是一样的,而且$nextTick更强大。
但实际并非如此,在指令的钩子函数中是没有办法访问this.$nextTick,因为其内部的this指向undefined
<script>
  import { nextTick } from "vue";

  export default {
    directives: {
      focus: {
        created(el, binding) {
          /* 错误写法,因为this指向
                this.$nextTick(() => {
                    el.focus()
                })
                */
          /* 这种方式可以,不过写法上较复杂
                 binding.instance.$nextTick(() => {
                     el.focus()
                 })
                 */
          // 以下是最简单写法
          nextTick(() => {
            el.focus();
          });
        },
      },
    },
  };
</script>

<template>
  <input type="text" v-focus />
</template>
注:
在实际开发中可以根据需要来选择,能用$nextTick的尽量用他,因为不需要再导入全局的nextTick
# 5、实战应用:显示最新消息对话
TIP
当我们新增了对话消息时,对话框右边的滚动条就会滚动到最下面,显示最新的一条。
<script>
  export default {
    data() {
      return {
        msgList: ["你好", "Hello Vue!!"],
        msg: "",
      };
    },
    methods: {
      async send() {
        this.msgList.push(this.msg);
        await this.$nextTick();
        this.$refs.msg.scrollTop = 99999999;
      },
    },
  };
</script>
<template>
  <div class="msg" ref="msg">
    <p v-for="(item, index) in msgList" :key="index">
      <span>{{ item }}</span>
    </p>
  </div>
  <div><input v-model="msg" /> <button @click="send">发送</button></div>
</template>
<style>
  .msg {
    width: 300px;
    height: 200px;
    overflow-y: auto;
    background-color: #ddd;
  }

  .msg p {
    text-align: right;
    margin: 10px 10px 0px 50px;
  }

  .msg p span {
    display: inline-block;
    padding: 5px;
    background-color: khaki;

    border-radius: 20px;
  }
</style>
# 六、组件实例属性
本小节我们来学习组件实例相关的属性,如下表:
| 组件实例属性 | 说明 |
|---|---|
$el | 获取该组件实例管理的 DOM 根节点 |
$parent | 获取该组件对应的父组件实例。如果当前组件是顶层组件,则为 null |
$root | 当前组件树的根组件实例。如果当前实例没有父组件,这个值就是它自己 |
代码示例
/src/App.vue根组件内容
<script>
  import Header from "./components/Header.vue";
  export default {
    components: {
      Header,
    },
  };
</script>

<template>
  <div class="main">
    <div class="top">顶部小导航</div>
    <header />
  </div>
</template>
/src/components/Header.vue 组件内容
<script>
  import Count from "./Count.vue";
  export default {
    components: {
      Count,
    },
  };
</script>
<template>
  <div class="header">
    <Count />
  </div>
</template>
/src/components/Count.vue组件内容
<script>
  export default {
    mounted() {
      console.log("组件本身的DOM根节点:", this.$el);
      console.log("组件对应父组件实例", this.$parent.$el);
      console.log("根组件的DOM根节点", this.$root.$el);
    },
  };
</script>
<template>
  <div>count</div>
</template>
最终渲染后,在控制台输出内容如下:

大厂最新技术学习分享群

微信扫一扫进群,获取资料
X