
# Generator 函数的实践与实践应用
TIP
本节内容我们开始学习 ES6 中的 Generator 函数、方法、实践应用
# 一、Generator 函数基础语法
TIP
Generator 函数是 ES6 提供的一种异步编程解决方案,在学习他的异步应用之前,我们先来学习他的基本语法。
Generator 函数可以理解为是一个遍历器(迭代器)对象的生成函数。
即:调用
Generator可以生成一个遍历器对象。
# 1、Generator 函数写法
TIP
与普通函数相比,Generator函数的写法有如下两个特征:
- function 命令与函数名之间有一个
*星号 - 函数体内部可以使用
yield语句定义不同的状态。(yield的英文意思是“产出”)
// 定义一个Generator函数
function* gen() {
    yield 1;
    yield 2;
    yield 3;
}

// 普通函数内部,不能使用 yield语句,使用会报错
function gen() {
    yield 1; // 报错
}
ES6 中并没有规定function关键字与函数名之间的*星号应该写在哪个位置,因此以下写法都是可行的
function* gen() {} // 一般会选择这种写法
function* gen() {}
function* gen() {}
function* gen() {}
// 由于Generator函数仍是普通的函数,所以一般会用第1种写法,星号紧跟在function关键字后面
# 2、Generator 函数的基本用法
TIP
Generator 函数可以理解为是一个遍历器(迭代器)对象的生成函数。
即:调用
Generator可以生成一个遍历器对象。
// 定义Generator函数
function* gen() {
  yield 1;
  yield 2;
  yield 3;
}

// 调用gen()函数,会返回一个遍历器对象
const iterator = gen();
// 调用遍历器的next方法,手动迭代下一个元素
console.log(iterator.next()); // {value: 1, done: false}
console.log(iterator.next()); // {value: 2, done: false}
console.log(iterator.next()); // {value: 3, done: false}
console.log(iterator.next()); // {value: undefined, done: true}
注:
上面定义的gen函数就是一个Generator函数,其内部用到了yield语句来维持 3 个状态。yield语句后面的值就是gen函数生成的遍历器对象的next()方法返回的对象的value属性值。
因为
Generator函数的返回值是一个遍历器对象,所以我们可以用for...of来遍历这个对象
// 定义Generator函数
function* gen() {
  yield 1;
  yield 2;
  yield 3;
}

// 调用gen()函数,会返回一个遍历器对象
const iterator = gen();
// for...of循环遍历遍历器对象
for (let v of iterator) {
  console.log(v);
}
// for..of循遍历结果: 1 2 3
调用 Generator 函数,并不会执行函数体中的任何代码,只是返回一个遍历器对象。只有调用遍历器对象的next()方法后,才会开始执行函数体内的代码。
function* gen() {
  console.log("第一次调用next");
  yield 1;
  console.log("第2次调用next");
  yield 2;
  yield 3;
}
const it = gen(); // gen()函数体中的代码并不会执行
it.next(); // 第一次调用next
it.next(); // 第2次调用next
注:
上面代码执行到it=gen()时,并不会执行 gen 函数体中的代码,只是生成了一个遍历器对象,所以并不会在控制台输出 “第一次调用 next” 语句。
当执行it.next(),开始执行执行gen 函数体中的代码,并在控制台输出 “第一次调用 next”。但并不会输出 “第 2 次调用 next”,只有当执行到it.next()时才会在控制台输出 “第 2 次调用 next”。
这里为什么呢?接下来我们就来了解下
yield表达式
# 3、yield 表达式
TIP
yield语句相当于一个暂停标志
当调用 Generator 函数时并不会执行函数体中的代码,而是生成一个遍历器对象。只有调用遍历器对象的next方法时,才会开始执行函数体中的代码。
遍历器对象的 next 方法运行逻辑如下:
- 第一次调用
next方法,开始执行函数体中的代码,执行遇到yield语句会暂停执行后面操作。并将紧跟在yield语句后面的表达式的值作为next方法返回对象的value属性值,done 属性值为false。 - 再次调用
next方法,会恢复执行,从上一次结束位置开始向下执行,如果遇到下一条 yield 语句,则重复上面的操作。如果没有再遇到新的yield语句,会一直运行到函数结束,直到遇到return语句为止。并将return后面表达式的值作为next返回对象的value属性值,done属性值为true。 - 如果该函数没有
return语句,则返回对象的value属性为undefined,done 属性值为true。
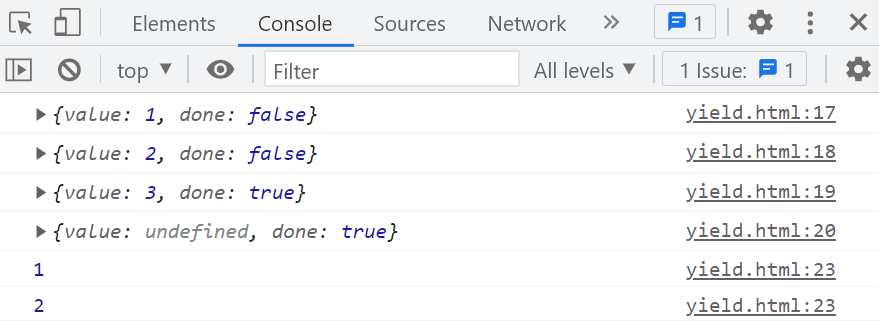
function* gen() {
  console.log("第一次调用next");
  yield 1;
  console.log("第2次调用next");
  yield 2;
  console.log("第3次调用next");
  return 3;
}
const it = gen(); // gen()函数体中的代码并不会执行
console.log(it.next()); // 第1次调用next {value: 1, done: false}
console.log(it.next()); // 第2次调用next {value: 2, done: false}
console.log(it.next()); // 第3次调用next {value: 3, done: true}
console.log(it.next()); // {value: undefined, done: true}
function* gen() {
  console.log("第一次调用next");
  yield 1;
  console.log("第2次调用next");
  yield 2;
  console.log("第3次调用next");
}
const it = gen(); // gen()函数体中的代码并不会执行
console.log(it.next()); // 第1次调用next {value: 1, done: false}
console.log(it.next()); // 第2次调用next {value: 2, done: false}
console.log(it.next()); // 第3次调用next {value: undefined, done: true}
温馨提示:
yield语句后面的表达式,只有当代码执行到当前这个yield语句时,后面的表达式才会求值。
function* gen() {
  yield console.log(1);
  yield console.log(2);
}
const it = gen();
it.next();
it.next();
# 4、区分 yield 与 return
TIP
yield相当于是一个暂停标志,一个 Generator 函数中可以有多个yield语句。每次执行遇到 yield 语句,就会暂停执行,将yield后面表达式的值为返回对象的value属性值,done属性值为false。只能再次调用 next 方法,才会继续向下执行。return相当于终止遍历器,当代码执行到return语句后,其后所有的代码都不会执行了。return后面表达式的值为返回对象的value属性值,done属性值为true表示遍历器迭代完成(终止)
for...of遍历时,并不会遍历 return 语句后面的值
function* gen() {
  yield 1;
  yield 2;
  return 3; // for...of 循环不会遍历到该值
}

const it = gen();
console.log(it.next());
console.log(it.next());
console.log(it.next());
console.log(it.next());

for (let v of gen()) {
  console.log(v); // 1 2
}
# 5、yield 注意事项
- yield 只能直接在 Generator 函数里面用,在 Generator 函数体中的普通函数中用也会报错
// 普通函数中使用抛出错误
function fn(){
    yield 1 ; // 抛错
}

// Generator函数内的普通函数中用,抛出错误
function* gen(){
    function fn(){
        yield 3;
    }
}

// Generator函数内的普通函数中用,抛出错误
function* gen(){
    [1,2,3].forEach((v)=>{
        yield v
    })
}
- yield 可以只作为暂停标志,后面啥也不写
function* gen() {
  yield;
  yield 2;
}
const it = gen();
console.log(it.next());
console.log(it.next());
console.log(it.next());
- yield 表达式如果在另一个表达式之中,必须放在圆括号里面
// 错误写法
function* gen() {
    let str = "hello" + yield 3; // 抛错
    console.log("hello" + yield 5); // 抛错
}


// 正确写法
function* gen() {
    let str = "hello" + (yield 3);
    console.log("hello" + (yield 5));
}
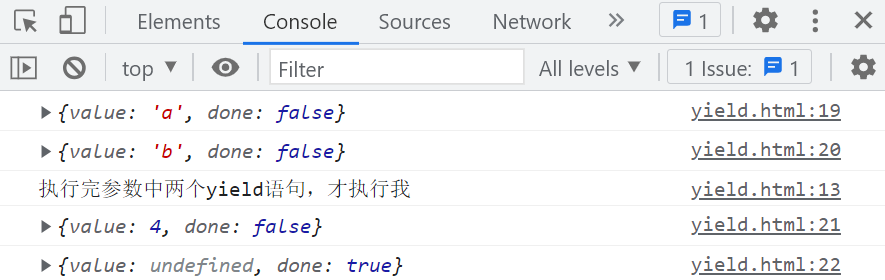
- yield 表达式用作函数参数或放在赋值表达式的右边,可以不用加括号
function* gen() {
  function Foo(foo) {
    console.log("执行完参数中两个yield语句,才执行我");
  }
  Foo(yield "a", yield "b");
  let num = yield 4;
}
const it = gen(); // 遍历器对象
console.log(it.next()); // {value: 'a', done: false}
console.log(it.next()); // {value: 'b', done: false}
console.log(it.next()); // 执行完参数中两个yield语句,才执行我  {value: 4, done: false}
console.log(it.next()); // {value: undefined, done: true}
# 6、next 方法的参数
TIP
yield语句本身没有返回值,或者说总是返回 undefined。
next 方法可以带一个参数,该参数会被当作上一条yield语句的返回值。
function* gen() {
  let a = yield 1; // yield语句默认没有返回值,或理解为返回值为undefined
  console.log(a);
  let b = a + 2; // NaN + 2
  console.log(b);
}
const it = gen();
it.next();
it.next(); // undefined NaN
function* gen() {
  let a = yield 1;
  console.log(a);
  let b = a + 2; // NaN + 2
  console.log(b);
}
const it = gen();
it.next();
it.next(10); // 10 12
// 相当于给函数体中的 a=10,则b=a+2=12
注:
首次调用 next 方法,传不传参数本质上是没有什么区别的,因为其参数表示上一条 yield 语句的返回值。
即时传参,JS 引擎也会忽略此次传参。
# 7、带参的 next 方法应用
TIP
next 方法可以带一个参数,并且这个参数用来表示上一条yield语句的返回值,所以我们可以利用这个特点向 Generator 函数体的变量注入值。
其中最典型的应用,就是用来处理异步交互。
function* main() {
  let result = yield request("http://www.xxx.com");
  result = JSON.parse(result); // 将返回的字符串解析成对象
  for (let key in result) {
    console.log(result[key]);
  }
}
// 模拟ajax发送数据
function request(url) {
  // 发送ajax请求,5秒后拿到返回的数据
  setTimeout(function () {
    let result = '{ "name": "清心", "age": 33 }';
    it.next(result); // 执行下一次迭代
  }, 5000);
}

const it = main();
it.next(); // 清心  33
# 8、yield* 表达式
TIP
yield* 表达式用于在一个 Generator 函数中执行另一个 Generator 函数。
因为直接在一个 Generator 函数中调用另一个 Generator 函数默认情况下是没有效果的。
function* foo() {
  yield 1;
  // 直接调用Generator函数 无任何效果
  bar();
  yield 5;
}
function* bar() {
  yield 2;
  yield 3;
}
const it = foo();
for (let v of it) {
  console.log(v); // 1 5
}
在 foo 函数中调用了另一个 Generator 函数 bar,相当于没有调用一样,直接被忽略。 所以最后结果为 1 5
function* foo() {
  yield 1;
  // 在yield后面调用Generator函数,相当于next的返回对象的value值是一个迭代器对象
  yield bar();
  yield 5;
}
function* bar() {
  yield 2;
  yield 3;
}
const it = foo();
console.log(it.next()); // {value: 1, done: false}
console.log(it.next()); // {value: bar, done: false}
console.log(it.next()); // {value: 5, done: false}
console.log(it.next()); // {value: undefined, done: true}

for (let v of foo()) {
  console.log(v); // 1 bar{}  5
}
在 yield 后面调用 Generator 函数,相当于 next 方法返回的对象中的 value 的属性值是一个迭代器对象
- 利用
yield*表达式在一个 Generator 函数中调用另一个 Genrator 函数。相当于使用一个遍历器遍历多个 Generator 函数,有递归的效果。
function* foo() {
  yield 1;
  yield* bar();
  yield 5;
}
function* bar() {
  yield 2;
  yield 3;
}
const it = foo();
// 其内部迭代过程
console.log(it.next()); // {value: 1, done: false}
console.log(it.next()); // {value: 2, done: false}
console.log(it.next()); // {value: 3, done: false}
console.log(it.next()); // {value: 5, done: false}
console.log(it.next()); // {value: undefined, done: true}

for (let v of foo()) {
  console.log(v); // 1 2 3  5
}
上面代码中的 foo 函数,相当于下面两种写法
// 写法1
function* foo() {
  yield 1;
  yield 2;
  yield 3;
  yield 5;
}
// 写法2
function* foo() {
  yield 1;
  for (let v of bar()) {
    yield v;
  }
  yield 5;
}
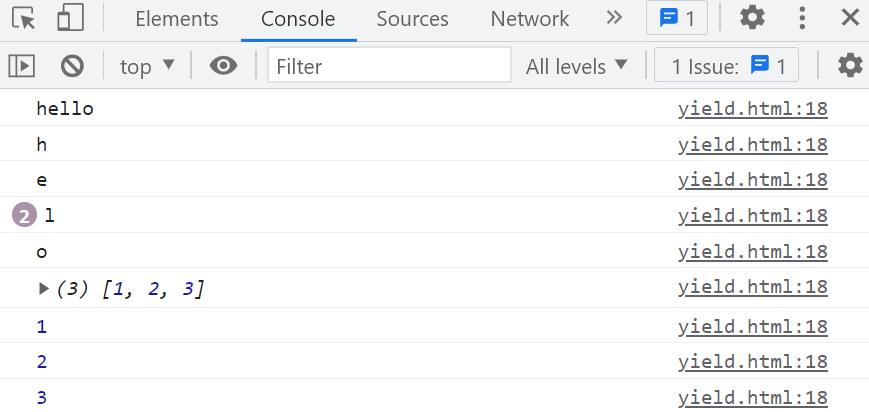
yield*表达式后面通常跟一个迭代器对象或可迭代对象。
function* gen() {
  yield "hello";
  yield* "hello";
  yield [1, 2, 3];
  yield* [1, 2, 3];
}
for (let v of gen()) {
  console.log(v);
}
# 9、遍历器的 throw 方法
TIP
Generator 函数返回的遍历器对象有一个throw方法,可以在函数体外抛出错误,并在函数体被 try...catch 捕获。
使用遍历对象的
throw方法,在 Generator 函数体外抛出错误时,会有以下三种处理情况
| 三种不同情况 | 描述 | 遍历器状态 |
|---|---|---|
| 第一种情况 | Generator 函数体内和外都没有用try...catch捕获该错误,则报错后,遍历器终止。 | 终止 |
| 第二种情况 | Generator 函数体内没有捕获该错误,被函数体外用try...catch捕获了该错误,则会终止遍历器 | 终止 |
| 第三种情况 | Generator 函数体内有捕获到该错误,则外部的try...catch就没有办法捕获该错误,同时捕获错误后会自动执行一次next。 | 不影响 |
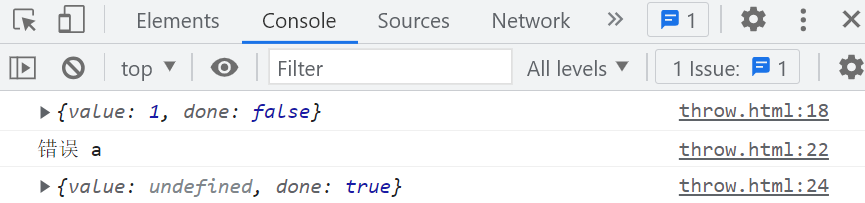
第一种情况
Generator 函数体内和外都没有用 try...catch 捕获该错误
function* gen() {
  yield 1;
  yield 2;
  yield 3;
  yield 4;
  yield 5;
}

const it = gen();
console.log(it.next());
it.throw("a"); // 往后代码都不执行了
console.log(it.next());

第二种情况
Generator 函数体内没有捕获该错误,在函数体外用try...catch捕获了该错误,则 throw 语句后,遍历器终止
function* gen() {
  yield 1;
  yield 2;
  yield 3;
  yield 4;
  yield 5;
}

const it = gen();
console.log(it.next());
try {
  it.throw("a");
} catch (e) {
  console.log("错误", e);
}
console.log(it.next());
第三种情况
Generator 函数体内有捕获该错误,则外部的try...catch就没有办法捕获该错误。
同时不会影响遍历器的下一次遍历。内部捕获了该错误后会自动执行下一次 next 方法,所以it.throw()返回值为下一次it.next()的返回值
function* gen() {
  yield 1;
  try {
    yield 2;
  } catch (e) {
    console.log("内部", e);
  }
  yield 3;
  yield 4;
  yield 5;
}

const it = gen();
console.log(it.next()); // {value: 1, done: false}
console.log(it.next()); // {value: 2, done: false}
try {
  // 注意,throw的结果为  内部 a   {value: 3, done: false}
  console.log(it.throw("a"));
} catch (e) {
  console.log("错误", e);
}
console.log(it.next()); // {value: 4, done: false}
console.log(it.next()); // {value: 5, done: false}
console.log(it.next()); // {value: undefined, done: true}
注:
上面的it.thorw('a')错误被Generator函数内部捕获,捕获后会自动执行一次next方法,所以打印it.trhow()的返回值为{value: 3, done: false}。
因为错误被Generator函数内部捕获,所以外部的try...catch句不会再捕获到错误,同时也不会影响遍历器的下一次遍历
我们再来分析下面这段代码
function* gen() {
  yield 1;
  try {
    yield 2;
  } catch (e) {
    console.log("内部", e);
  }
  yield 3;
  yield 4;
  yield 5;
}

const it = gen();
console.log(it.next()); // {value: 1, done: false}
console.log(it.next()); // {value: 2, done: false}
try {
  // 注意,throw的结果为  内部 a   {value: 3, done: false}
  console.log(it.throw("a"));
  console.log(it.throw("b")); // 错误 b
} catch (e) {
  console.log("错误", e);
}
console.log(it.next()); // {value: undefined, done: true}
console.log(it.next()); // {value: undefined, done: true}
console.log(it.next()); // {value: undefined, done: true}
上面的第一个错误it.throw('a')被Generator函数内部捕获,由于Generator函数内部的try...catch语句已经执行了,所以第二个错误it.throw('b')被外部的try...catch语句捕获。错误被外部捕获,则遍历器终止。
总结:
- 遍历器调用
throw方法抛出的错误如果没有捕获处理,其后代码就没办法执行。 - 遍历器调用
throw方法抛出的错误如果没有在 Generator 函数内部捕获处理,就会造成遍历器终止。 - 遍历器调用
throw方法抛出的错误如果在 Generator 函数内部捕获处理,其处理后,还会自动执行 next 方法。
# 10、遍历器的 throw 方法和全局 throw 命令
TIP
全局 throw 命令在 Generator 体外抛出错误,并不能被 Generator 函数内部捕获,只能被外部的try..catch捕获
function* gen() {
  yield 1;
  try {
    yield 2;
  } catch (e) {
    console.log("内部", e);
  }

  yield 3;
  yield 4;
  yield 5;
}

const it = gen();
console.log(it.next()); // {value: 1, done: false}
console.log(it.next()); // {value: 2, done: false}
try {
  throw new Error("全局throw抛错");
} catch (e) {
  console.log(e); // Error: 全局throw抛错
}

console.log(it.next()); // {value: 3, done: false}
console.log(it.next()); // {value: 4, done: false}
全局 throw 命令在 Generator 体内抛出错误,内部没有捕获该错误,在外部捕获,则遍历器终止
function* gen() {
  yield 1;
  throw new Error("全局throw抛错");
  yield 2;
  yield 3;
  yield 4;
  yield 5;
}

const it = gen();
console.log(it.next()); // {value: 1, done: false}
try {
  console.log(it.next());
} catch (e) {
  console.log(e); // Error: 全局throw抛错
}

console.log(it.next()); // {value: undefined, done: true}
console.log(it.next()); // {value: undefined, done: true}
全局 throw 命令在 Generator 体内抛出错误,内部有捕获该错误,则不影响遍历器的下一次遍历
function* gen() {
  yield 1;
  try {
    throw new Error("全局throw抛错");
    yield 2;
  } catch (e) {
    console.log(e);
  }
  yield 3;
  yield 4;
  yield 5;
}

const it = gen();
console.log(it.next()); // {value: 1, done: false}
console.log(it.next()); // Error: 全局 throw 抛错 {value: 3, done: false}
console.log(it.next()); // {value: 4, done: false}
console.log(it.next()); // {value: 5, done: false}
全局 throw 命令在 Generator 体内抛出错误,内部没有捕获该错误,则遍历器终止
function* gen() {
  let result = yield 1;
  yield result();
  yield 3;
  yield 4;
}

const it = gen();
console.log(it.next()); // {value: 1, done: false}
try {
  console.log(
    it.next(function () {
      throw new Error("a");
    })
  );
} catch (e) {
  console.log("错误", e); // 错误 Error: a
}

console.log(it.next()); // {value: undefined, done: true}
console.log(it.next()); // {value: undefined, done: true}
# 11、throw 方法总结
注意:
- 遍历器的 throw 方法在 Generator 函数体外抛出的错误,可以在 Generator 函数体内捕获处理
- 全局 throw 在 Generator 函数体外抛出的错误不能在 Generator 函数体内捕获
三种情况抛出错误的处理方式的区别
| 三种情况 | 不处理 | Generator 函数体内处理 | Generator 函数体外处理 |
|---|---|---|---|
| Generator 函数体内抛出的错 | 后续代码都没有办法执行 | 不会影响遍历器的下一次遍历 | 遍历器终止 |
| 遍历器的 throw 方法在 Generator 函数体外抛错 | 后续代码都没有办法执行 | 不会影响遍历器的下一次遍历 | 遍历器终止 |
| 全局的 throw 方法在 Generator 函数体外抛错 | 后续代码都没有办法执行 | xxxxxx | 不会影响遍历器的下一次遍历 |
测试题
以下代码运行结果是:
function* gen() {
  yield 1;
  try {
    throw new Error("a");
    yield 2;
  } catch (e) {
    console.log("内部", e);
  }
  yield 3;
  yield 4;
}

const it = gen();
console.log(it.next());
try {
  it.next();
  it.throw("b");
} catch (e) {
  console.log("外部", e);
}
console.log(it.next());
console.log(it.next());
以下代码运行结果是:
function* gen() {
  yield 1;
  try {
    throw new Error("a");
    yield 2;
  } catch (e) {
    console.log("内部", e);
  }
  yield 3;
  yield 4;
}

const it = gen();
console.log(it.next());
try {
  console.log(it.next());
  throw new Error("b");
} catch (e) {
  console.log("外部", e);
}
console.log(it.next());
console.log(it.next());
以下代码运行结果:
function* gen() {
  let result = yield 1;
  try {
    yield result() + 2;
  } catch (e) {
    console.log(e, "内部捕获");
  }
  yield 3;
  yield 4;
  yield 5;
}

const it = gen();
console.log(it.next()); // {value: 1, done: false}
try {
  console.log(
    it.next(function () {
      throw new Error("错误被");
    })
  );
} catch (e) {
  console.log(e, "外部捕获");
}
console.log(it.next()); // {value: 4, done: false}
console.log(it.next()); // {value: 5, done: false}
# 12、Generator 函数的 return 方法
TIP
Generator 函数返回的遍历器对象有一个return方法,可以返回给定的值,并终结Generator的遍历。
function* gen() {
  yield 1;
  yield 2;
  yield 3;
}

const it = gen();
console.log(it.next()); // {value: 1, done: false}
console.log(it.return("停止")); // {value: '停止', done: true}
console.log(it.next()); // {value: undefined, done: true}
上面代码中
遍历器对象it调用return方法后,其返回对象的value属性值为return方法的参数 "停止",done属性值为true。表示遍历器对象终止遍历,之后再调用next方法,返回对象始终为{value: undefined, done: true}
如果
Generator函数内部有try...finally代码块,那么return方法会推迟到finally代码块执行完后再执行。
注意区分以下情况
- 如果代码还没有执行到 try 语句,就调用了
return方法,则后面所有代码都不会执行,遍历器终止
function* gen() {
  yield 1;
  try {
    yield 2;
    throw new Error("a");
  } catch (e) {
    console.log("内部", e);
  } finally {
    yield 4;
    yield 5;
  }
}

const it = gen();
console.log(it.next());
console.log(it.return("bc")); // 还没有执行到try...相关代码,就终止
console.log(it.next());
console.log(it.next());
console.log(it.next());
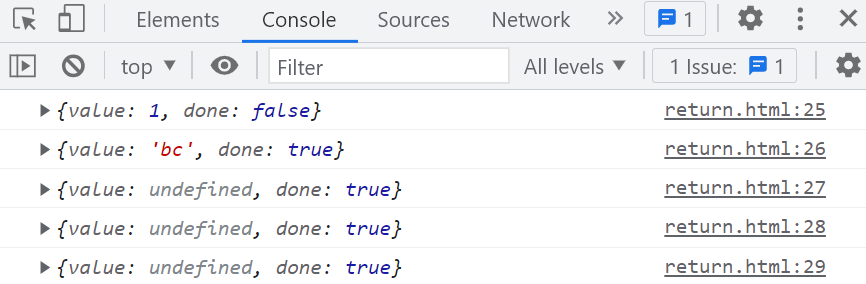
执行到try语句中,然后再 return,则会先把finally中的代码执行完,再执行return方法,终止遍历器
function* gen() {
  yield 1;
  try {
    yield 2;
    throw new Error("a");
  } catch (e) {
    console.log("内部", e);
  } finally {
    yield 4;
    yield 5;
  }
}

const it = gen();
console.log(it.next()); // {value: 1, done: false}
console.log(it.next()); // {value: 2, done: false}
console.log(it.return("bc")); // {value: 4, done: false}
console.log(it.next()); // {value: 5, done: false}
console.log(it.next()); // {value: 'bc', done: true}
console.log(it.next()); // {value: undefined, done: true}
代码执到try{}后,再调用return方法,则终止遍历器
function* gen() {
  yield 1;
  try {
    yield 2;
    throw new Error("a");
  } catch (e) {
    console.log("内部", e);
  } finally {
    yield 4;
    yield 5;
  }
  yield 6;
}

const it = gen();
console.log(it.next()); // {value: 1, done: false}
console.log(it.next()); // {value: 2, done: false}
console.log(it.next()); // 内部 Error: a {value: 4, done: false}
console.log(it.return("bc")); // {value: 'bc', done: true}
console.log(it.next()); // {value: undefined, done: true}a
# 12、作为对象属性的 Generator 函数
TIP
如果一个对象的属性是 Generator 函数
那么可以简写成以下形式
const obj = {
  gen: function* () {},
};

// 简写形式
const obj = {
  *gen() {},
};
const obj = {
  // 对象属性为Generator函数
  *gen() {
    yield 1;
    yield 2;
    yield 3;
  },
};
// for...of遍历
for (let v of obj.gen()) {
  console.log(v); // 1 2 3
}
# 13、Generator 函数的实例
- Generator 函数不能用作构造函数,所以不能用 new 关键字来调用
function* Gen(a, b) {
  this.a = a;
  this.b = b;
}
const gen = new Gen(1, 2);
- Generator 函数和普通函数上样,直接调用 Generator 函数,其内部的 this 指向 window,作为对象的方法被调用,this 为调用该方法的对象
function* gen() {
  console.log(this);
}
const it = gen();
it.next(); // window
- Generator 函数的返回值是一个遍历器。ES6 规定这个遍历器是 Generator函数的实例,它也继承了 Generator 函数的 prototype 对象上的方法。
function* gen() {
  yield 1;
}

gen.prototype.sayHello = function () {
  console.log("大家好,我是Generator函数原型上的方法");
};

const it = gen();
console.log(it instanceof gen); // true
it.sayHello(); // 大家好,我是Generator函数原型上的方法
# 二、Generator 函数应用
TIP
深入浅出 Generator 函数的实践和应用
# 1、Generator 函数实现 Iterator 接口
TIP
在学习 Iterator 迭代器(遍历器)时,我们知道,一个对象要想成为可迭代对象,能够被 for..of 遍历,必须满足:“可迭代协议” 和 “迭代器协议”
- “可迭代协议” 是指对象身上必需要有 [Symbol.iterator],其返回值为一个迭代器对象
- “迭代器协议” 是指迭代器对象必需要有 next 方法,next 方法的返回值必需是一个具有 value 和 done 两个属性的对象。vaule 属性的值为每次迭代的成员,done 性值为布尔值,用来标识所有成员是否全部迭代完成。
手动实现一个迭代器对象非常麻烦,而 Generator 函数可以轻松帮我们实现。
Generator 函数,本质就是一个生成器函数,用来生成遍历器对象。所以我们可以把对象的[Symbol.iterator]属性值设置为一个 Generator 函数
const obj = {
  data: [1, 2, 3, 4, 5],
  // [Symbol.iterator]:function* (){}
  *[Symbol.iterator]() {
    for (let i = 0; i < this.data.length; i++) {
      yield this.data[i];
    }
  },
};

for (let v of obj) {
  console.log(v); // 1 2 3 4 5
}
简化版,利用yield*,后面会学习到
const obj = {
  data: [1, 2, 3, 4, 5],
  // 生成器函数,生成一个迭代器(遍历器)对象
  *[Symbol.iterator]() {
    yield* this.data;
  },
};

for (let v of obj) {
  console.log(v); // 1 2 3 4 5
}
# 2、将数组按深度扁平化
// 将数组展平
function flat(arr, depth) {
  // Generator函数,将数组中所有嵌套元素展平列出
  function* gen(arr, n = 0) {
    if (Array.isArray(arr)) {
      n--;
      if (n < -1) {
        yield arr;
      } else {
        for (let i = 0; i < arr.length; i++) {
          yield* flat(arr[i], n);
        }
      }
    } else {
      yield arr;
    }
  }

  // 结果数组
  const arr2 = [];
  for (let v of gen(arr, depth)) {
    arr2.push(v);
  }
  return arr2;
}

let arr = [1, [2, 3], 4, [5, [6], 7], [8], [9], 10];
console.log(flat(arr, 1));
# 3、深度优先遍历 DOM 树
TIP
深度遍历以下 DOM 树的结构
<div id="container">
<ul>
<li>
<h3>标题</h3>
<div class="box2">
<img src="" alt="图片" />
<p>描述</p>
<p><span>价格:</span><i>50</i></p>
</div>
</li>
</ul>
</div>
<script>
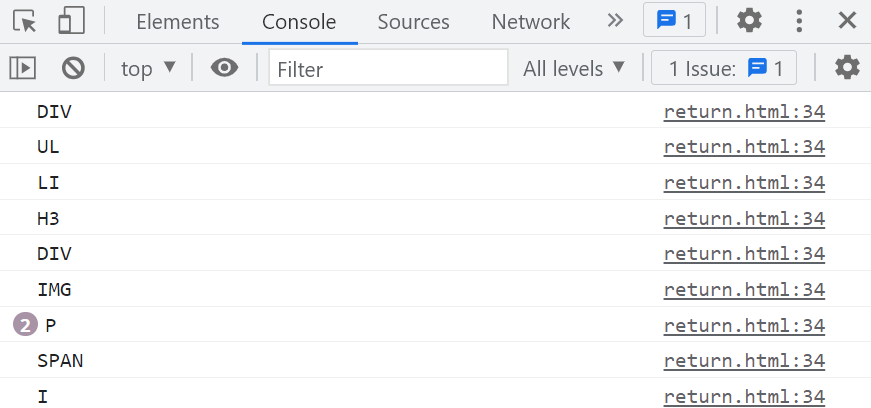
function* getDomTree(node) {
yield node.tagName;
if (node.children.length > 0) {
for (let i = 0; i < node.children.length; i++) {
yield* getDomTree(node.children[i]);
}
}
}
const node = document.getElementById("container");
for (let el of getDomTree(node)) {
console.log(el);
}
</script>
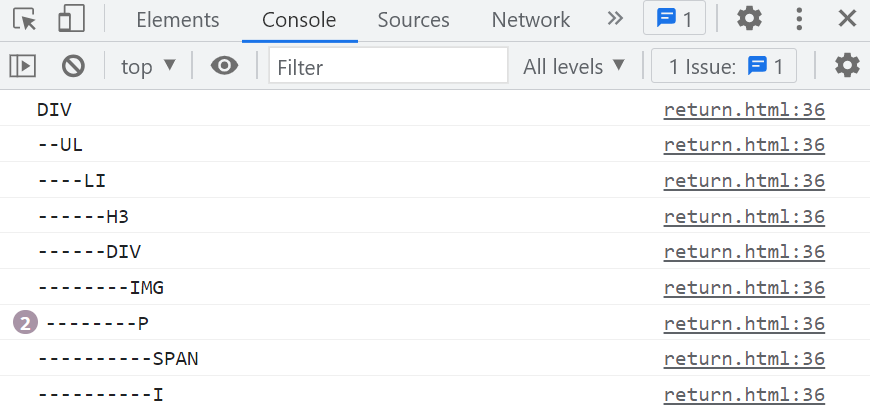
带
--前缀的
<div id="container">
  <ul>
    <li>
      <h3>标题</h3>
      <div class="box2">
        <img src="" alt="图片" />
        <p>描述</p>
        <p><span>价格:</span><i>50</i></p>
      </div>
    </li>
  </ul>
</div>

<script>
  // node表示DOM节点  n用来控制标签前面--填充的个数
  function* getDomTree(node, n = 0) {
    yield "-".repeat(n) + node.tagName;
    if (node.children.length > 0) {
      n += 2; // 下一级--加2
      for (let i = 0; i < node.children.length; i++) {
        yield* getDomTree(node.children[i], n);
      }
    }
  }
  const node = document.getElementById("container");
  for (let el of getDomTree(node)) {
    console.log(el);
  }
</script>
温馨提示:
关于 Generator 函数异步的应用,在学完到异步相关的内容时,再讲。
# 三、重难点总结
TIP
关于本章讲解的 Generator 函数,重点掌握以下几个方面
# 1、Generator 函数的写法
function* gen() {}
# 2、Generator 函数的基本用法
TIP
Generator 函数用来生成一个遍历器对象,调用 Generator 函数并不会执行函数体中的代码,只有调用遍历器的 next 方法才会开始执行函数体中的代码。
next 方法的返回值对象中的 value 值为 yield 后面的表达式的值。
function* gen() {
  yield 1;
  yield 2;
  yield 3;
}
const it = gen();
console.log(it.next()); // {value: 1, done: false}
console.log(it.next()); // {value: 2, done: false}
console.log(it.next()); // {value: 3, done: false}
# 3、yield 和 return
TIP
yield 表达式相当于一个暂停标志,调用遍历器的 next 方法开始执行 Generator 函数体中,执行到 yield 表达式就会暂停执行,当再一次调用 next 方法时又会继承从原来位置开始向下执行代码,遇到 yield 又会暂停。
如果代码在向下执行时遇到return,则遍历器终止,其返回结果对象的value属性值为return后面表达式的值,done属性值true。 往后调用 next 方法其返回值为{value:undefined:true;}
# 4、next 方法的参数
TIP
next 方法允许带一个参数,这个参数为上一次 yield 表达式的返回值。
所以第一次调用next()方法不用传参数,传了也会被忽略,因为第一个 next 方法的前面没有 yield 表达式
function* gen() {
  let a = yield 1;
  console.log(a);
  let b = yield 2;
  console.log(b);
}
const it = gen();
it.next();
it.next("aa"); // aa
it.next("bb"); // bb
next 方法的参数常用来处理异步交互时,向下一步操作传递数据。
function* gen() {
  let result = yield request();
  result = JSON.parse(result);
  console.log(result);
}

// 模拟异步发送请求,2s后拿数据,把数据做为next的参数,用于下一步操作
function request() {
  setTimeout(function () {
    it.next('{"a":1,"b":2}');
  }, 2000);
}
const it = gen();
it.next(); // {a: 1, b: 2}
# 5、yield* 表达式
TIP
yield*表达式主要是为了解决在 Generator 函数中能调用 Generator 函数。因为 Generator 函数不能直接在一另一个 Generator 函数中调用
yield*表达式的后面可以是一个可遍历对象,也可以是一个遍历器对象。
# 6、遍历器的 throw 和全局 throw 命令
TIP
遍历器的 throw 方法在 Genrator 函数体外抛出的错误可以在 Generator 函数体内被捕获。
全局 throw 命令在 Genrator 函数体外抛出的错误不可以在 Generator 函数体内被捕获。
三种情况抛出错误的处理方式的区别
| 三种情况 | 不处理 | Generator 函数体内处理 | Generator 函数体外处理 |
|---|---|---|---|
| Generator 函数体内抛出的错 | 后续代码都没有办法执行 | 不会影响遍历器的下一次遍历 | 遍历器终止 |
| 遍历器的 throw 方法在 Generator 函数体外抛错 | 后续代码都没有办法执行 | 不会影响遍历器的下一次遍历 | 遍历器终止 |
| 全局的 throw 方法在 Generator 函数体外抛错 | 后续代码都没有办法执行 | xxxxxx | 不会影响遍历器的下一次遍历 |
# 7、Generator 函数的应用
TIP
- 用 Generator 函数实现 Iterator 接口
- 实现将数组扁平化
- 深度优先遍历 DOM 树
- Generator 函数实现异步交互(next 方法传参的案例)
大厂最新技术学习分享群

微信扫一扫进群,获取资料
X